
What if your AI agent could track your work hours, remember your skipped breaks, choose a YouTube song, adjust your PC volume, and lock your screen to force a break?
That is exactly what we are building today. No more basic “calculator” demos. This is a real-world Python MCP Server.
This project covers everything you need to master the Model Context Protocol (MCP):
MCP Resources: Read data (like checking a timer).
MCP Tools: Perform actions (like locking Windows).
MCP Prompts: Guide the AI’s behavior.
Advanced AI: Powered by LangGraph and Groq.
Human-in-the-Loop: Ask for your permission before taking action.
This is Part 1, where we build and understand the server.py file. Our goal is simple: learn exactly how an MCP server works, what capabilities it gives the AI, and how data flows in and out.
(Note: If you want to jump straight in, the full server.py code is provided at the bottom of this page!)
In Part 2, we will connect this MCP server to a fully functional LangGraph + Groq AI agent, complete with state management, routing, and safe tool execution.
The Architecture First
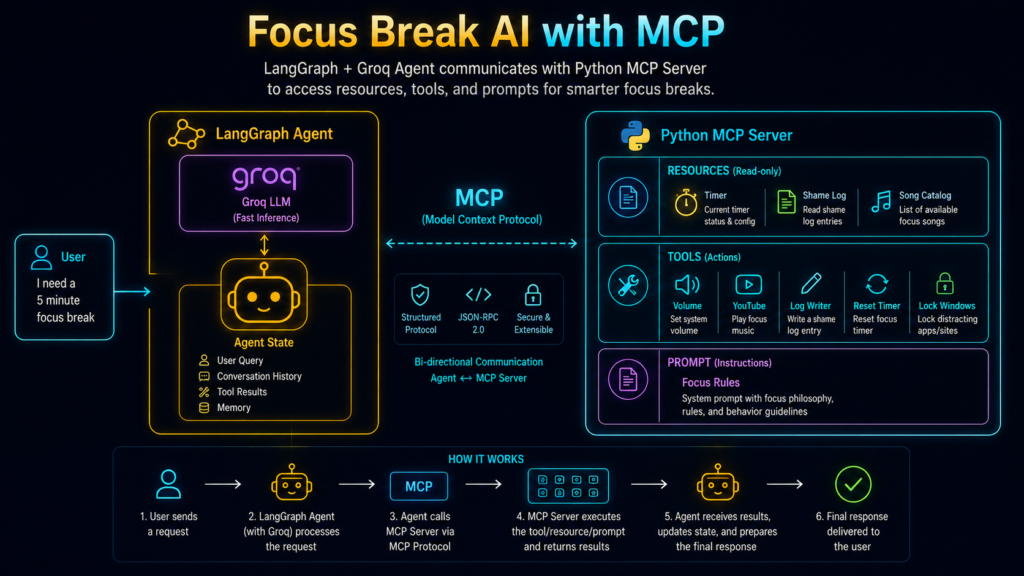
Our system is split into two responsibilities:
LangGraph Agent
"What should happen?"
        │
        │ MCP
        ▼
MCP Server
"What can actually be done?"
Inside the MCP server:
MCP SERVER
│
├── Resources
│   ├── timer://session
│   ├── shame://log
│   └── songs://catalog
│
├── Tools
│   ├── set_volume()
│   ├── play_song()
│   ├── lock_screen()
│   ├── write_shame_log()
│   └── reset_session()
│
└── Prompt
    └── check-focus
The easiest mental model is:
Resource = READ
Tool     = DO
Prompt   = GUIDE
That single idea explains almost the entire server.
Project Setup
Our important files are:
focus-break-ai/
│
├── mcp_server/
│   └── server.py
│
├── agent/
│   └── agent.py
│
├── data/
│   ├── session.json
│   └── shame_log.txt
│
├── .env
└── requirements.txt
The server exposes capabilities.
The agent decides when and how to use them.
Later, agent.py launches this MCP server as a separate Python process using StdioServerParameters and communicates with it through MCP’s stdio transport.
Our dependencies are:
mcp[cli]==1.29.0
langgraph
langchain-core
langchain-groq
python-dotenv
pycaw
comtypes
yt-dlp
Install them with:
pip install -r requirements.txtFor this article, the most important packages are:
mcp— builds the MCP server.pycaw+comtypes— control Windows volume.langgraph,langchain-groq,yt-dlp— mainly used in Part 2.
Our .env contains:
GROQ_API_KEY=your_api_key
GROQ_MODEL=openai/gpt-oss-120b
The MCP server itself does not call Groq. The agent does. That separation matters.
Creating the MCP Server
Setting up a Model Context Protocol (MCP) server in Python takes just two lines of code:
from mcp.server.fastmcp import FastMCPmcp = FastMCP("Focus Break MCP Server")
Think of mcp as a smart registry for your AI. Whenever you use the @mcp.resource(...) or @mcp.tool() decorators, you are simply telling the server:
“Expose this Python function to the AI agent.”
This allows any MCP client (like a LangGraph agent) to instantly discover and use your local tools, without ever needing to see your underlying code.
Building Reliable File Paths
Our MCP server needs a data/ directory to save persistent files. We use Python’s pathlib to create dynamic file paths instead of hard-coding them.
BASE_DIR = Path(__file__).resolve().parent.parent

DATA_DIR = BASE_DIR / "data"

SHAME_LOG_FILE = DATA_DIR / "shame_log.txt"
SESSION_FILE = DATA_DIR / "session.json"
How Path(__file__) Works (Step-by-Step):
Imagine your project folder looks like this: focus-break-ai / mcp_server / server.py
Let’s break down this magic line: Path(__file__).resolve().parent.parent
__file__→ Locates your current script (server.py)..parent→ Moves up one folder (tomcp_server/)..parent(again) → Moves up to the main root folder (tofocus-break-ai/).
Now, BASE_DIR perfectly points to your root project folder. To get the data folder, we simply attach it: BASE_DIR / "data".
Why not just type "C:/Users/me/project/data"?
Because hard-coded paths break! If a user downloads your project to their Mac, Linux, or a different Windows folder, that exact C:/ drive path won’t exist, and your app will instantly crash.
Using __file__ ensures your Python script always finds the correct files automatically, no matter whose computer it runs on.
Auto-Creating Persistent Storage in Python
We need a safe place to save our MCP server’s data. First, we make sure our data/ folder actually exists:
DATA_DIR.mkdir(parents=True, exist_ok=True)
parents=True: Tells Python to create any missing main folders along the way.exist_ok=True: Prevents the code from crashing if the folder is already there.
Next, we create our blank log and session files—but only if they don’t already exist:
# Create an empty text file for the shame log
if not SHAME_LOG_FILE.exists():
    SHAME_LOG_FILE.write_text("", encoding="utf-8")

# Create a JSON file to track the session start time
if not SESSION_FILE.exists():
    SESSION_FILE.write_text(
        json.dumps({"started_at": time.time()}),
        encoding="utf-8"
    )
The resulting JSON file will simply look like this:
{
  "started_at": 1787321042.43
}
Why save a single timestamp instead of running a live background timer?
Because doing the math on-demand is much easier and saves system memory. Whenever the AI asks for the time, we just do simple math:
Current Time – Start Time = Elapsed Seconds
Divide those seconds by 60, and you instantly get your active minutes. This completely removes the need to write complex, battery-draining background loops!
Building Our First MCP Resource: The Focus Timer
To give our AI agent read-only data, we create an MCP Resource.
Remember the golden rule of the Model Context Protocol: Resource = READ.
Our AI agent needs to check how long you have been working, but it shouldn’t be able to change the clock. We expose this data to the agent using the timer://session URI.
Here is the Python code:
@mcp.resource("timer://session", mime_type="application/json")
def get_timer_session() -> dict:

    # Step 1: Read the JSON file and convert it into a Python dictionary
    session_data = json.loads(SESSION_FILE.read_text(encoding="utf-8"))
    started_at = session_data["started_at"]

    # Step 2: Calculate how many minutes have passed
    elapsed_seconds = time.time() - started_at
    active_minutes = int(elapsed_seconds / 60)

    # Step 3: Return the data to the AI agent
    return {
        "status": "working",
        "active_minutes": active_minutes
    }
How the Data Flows :
Instead of forcing the AI to figure out timestamps, our MCP server does the heavy lifting:
It opens
session.json.It subtracts your start time from the current time to find the
active_minutes.It packages this into a clean JSON response for the AI.
Why is this powerful? In Part 2, our LangGraph agent will passively read this exact MCP resource and inject active_minutes directly into its state, deciding instantly if you need a forced break!
Resource Two: Persistent AI Memory (The “Shame Log”)
Our AI needs a memory. If you repeatedly skip your breaks, the AI should know about it and adjust its behavior. We expose this history as a plain-text MCP Resource using the shame://log URI.
Here is the Python code:
@mcp.resource("shame://log", mime_type="text/plain")
def get_shame_log() -> str:

    # Step 1: Read the log file
    content = SHAME_LOG_FILE.read_text(encoding="utf-8").strip()

    # Step 2: Return the history, or a default message if empty
    if not content:
        return "No break violations recorded yet."

    return content
Why is this so important for AI Agents?
This is an example of persistent agent context.
Imagine you rejected your recommended breaks twice today. Because this data is saved to a file and exposed as an MCP Resource, the history survives even if your main agent.py script restarts.
Later, our MCP Prompt will use this exact context to tell the AI: “If this user has repeatedly ignored breaks today, become much stricter.” By giving the AI access to historical behavior, you transform a basic script into an intelligent, adaptive assistant.
Resource Three: The Song Catalog
Our third MCP Resource provides a list of music options. Since we only want the AI to read this data, we expose a simple Python dictionary using the songs://catalog URI.
Here is the complete code:
# The predefined list of allowed songs
SONGS = {
    "lofi": {"name": "Chill Lofi", "url": "https://youtube.com/..."},
    "bollywood": {"name": "Bollywood Energy", "url": "https://youtube.com/..."},
    "metal": {"name": "Heavy Metal", "url": "https://youtube.com/..."},
    "fun": {"name": "Random Fun Break", "url": "https://youtube.com/..."}
}

@mcp.resource("songs://catalog", mime_type="application/json")
def get_song_catalog() -> dict:
    # Returns the entire song catalog as a JSON object
    return SONGS
The Golden Rule of Predictable AI
You might wonder: Why not just let the AI search for a song on its own?
Here is a crucial AI design principle: The application defines the options; the LLM just makes the choice.
In Part 2, our agent will read this catalog and send it to the Groq LLM. The model is then forced to choose one of our exact keys (like lofi or metal). By strictly defining the categories in our Python MCP server, we completely eliminate AI hallucinations and keep our workflow 100% predictable!
Building an MCP Tool: Controlling Windows Volume
Now we move from reading data (Resources) to taking action. We are going to build an MCP Tool that allows our AI agent to change the Windows system volume.
Remember: Tool = DO.
Here is the complete Python code using the pycaw library to control the operating system’s audio:
from pycaw.pycaw import AudioUtilities

@mcp.tool()
def set_volume(level: int = 50) -> str:

    # Step 1: Validate AI input (Security first!)
    if level < 0 or level > 100:
        return "Error: Volume must be an integer between 0 and 100."

    # Step 2: Connect Python to the Windows speaker device
    device = AudioUtilities.GetSpeakers()
    volume_endpoint = device.EndpointVolume

    # Step 3: Convert the 0-100 scale to a 0.0-1.0 decimal for the Windows API
    volume_endpoint.SetMasterVolumeLevelScalar(level / 100, None)

    return f"Success: System volume set to {level}%."
How This Tool Works :
Strict Input Validation: We force the AI to pass a number between 0 and 100. Whenever an external AI agent provides arguments to your system, you must validate them to prevent crashes.
The OS Connection: The
pycawlibrary acts as a bridge, linking our Python script directly to the Windows audio endpoint.The Quick Math: Our function uses a human-readable 0–100 scale, but the Windows API expects a decimal between
0.0and1.0. By dividing the input by 100 (e.g.,50 / 100 = 0.5), we perfectly sync the AI’s command with the operating system.
Crucial Note on AI Safety: Unlike simply reading a file, changing your system volume is a real physical side effect on your computer. This is exactly why our LangGraph workflow in Part 2 will strictly require Human-in-the-Loop (HITL) approval before letting the AI execute this break action!
Opening YouTube via Windows Automation
While Resources let the AI read, MCP Tools let the AI act.
Our next tool gives the AI agent the ability to open a YouTube video directly in your default Windows browser using Python.
Here is the code:
@mcp.tool()
def play_song(song_url: str) -> str:

    # Step 1: Validate the input to prevent AI hallucinations
    if not song_url.startswith(("http://", "https://")):
        return "Error: Invalid song URL. Must be a web link."

    # Step 2: Ask Windows to open the URL in the default browser
    os.startfile(song_url)

    return f"Successfully opened: {song_url}"
How this Tool Works (In Plain English)
Smart Validation: The AI might hallucinate and try to pass random text (like
"hello") or local file paths (like"C:/files"). Thestartswithcheck ensures the tool only accepts actual web links.Windows Automation: Python’s built-in
os.startfile()command tells the Windows operating system to open that specific URL in your default web browser automatically.
A Crucial AI Architecture Rule: Separation of Concerns
Notice what this tool doesn’t do: It does not search YouTube.
The MCP server’s only job is to open a URL. In Part 2, our LangGraph agent will handle the heavy lifting—using yt-dlp to search YouTube, pick the right video, and then pass the exact link to this MCP tool.
Keeping your server actions simple and letting your agent handle the logic is the secret to building reliable AI workflows!
Locking Windows via Native APIs
The shortest tool in our server performs the most powerful action. This is exactly where the Model Context Protocol (MCP) proves it is vastly superior to standard AI chatbots.
We are giving our AI agent the ability to lock your PC screen by bridging Python directly to the native Windows operating system.
@mcp.tool()
def lock_screen() -> str:
    try:
        # Step 1: Call the native Windows OS API to lock the PC
        ctypes.windll.user32.LockWorkStation()
        return "Success: Windows workstation locked."

    except Exception as error:
        # Step 2: Catch and return any system errors to the AI
        return f"Error: Could not lock screen: {error}"
How this Tool Works (In Plain English)
The magic happens in a single line: ctypes.windll.user32.LockWorkStation().
Instead of just generating chat text, this command creates a direct automation bridge:
AI Workflow ➔ MCP Server ➔ Python ➔ Native Windows API.
This allows your AI agent to step outside the terminal and interact directly with real desktop software and OS-level capabilities.
The Golden Rule: Capability Does Not Mean Permission
Giving an AI the power to lock your screen is dangerous if left completely unchecked. That is why we must separate the action from the decision.
In Part 2, our LangGraph agent introduces a strict Human-in-the-Loop (HITL) approval step. The AI can request to lock the screen, but the chain will pause and wait for your final YES before this powerful MCP tool is allowed to execute!
Building an MCP Tool: Writing Persistent Logs
When a user rejects a recommended break, we don’t want the AI to just forget about it. We want the AI to remember your behavior for the future.
To do this, we will build an MCP Tool that uses basic Python file handling to permanently record (log) these rejections.
Here is the code:
@mcp.tool()
def write_shame_log(message: str) -> str:

    # Step 1: Create a human-readable timestamp (e.g., 21 August 2026, 10:25 PM)
    timestamp = datetime.now().strftime("%d %B %Y, %I:%M %p")
    entry = f"{timestamp}: {message}\n"

    # Step 2: Open the text file in "append" mode and save the log
    with SHAME_LOG_FILE.open("a", encoding="utf-8") as file:
        file.write(entry)

    return "Success: Break rejection logged."
How this Tool Works :
The “Append” Mode: Notice the
"a"in theopen()function. This stands for append. If we used"w"(write), Python would erase the old history every time. By appending, the log grows continuously, keeping a permanent record of every time you ignored the AI.Persistent Storage: Even if the MCP server or the LangGraph agent crashes and restarts, this text file remains safely on your hard drive.
The True Power of MCP: The Autonomous Feedback Loop
This simple tool creates one of the most advanced concepts in AI agent architecture: The Feedback Loop.
Here is how the data flows: User Rejects Break ➔ AI Calls write_shame_log() Tool ➔ Saved to shame_log.txt ➔ Future AI reads the shame://log Resource.
Because we expose this text file as an MCP Resource (which we built earlier), the AI can passively read your past behavior. If the AI sees you have cheated on your last three breaks, it will dynamically change its prompt to be much stricter next time!
Building an MCP Tool: Resetting Session State in Python
Once a focus break is triggered, the AI agent needs a way to restart the timer. If it doesn’t, the server will keep counting elapsed time from the original session timestamp.
We create an MCP Tool to overwrite the current state with a fresh start time.
Here is the code:
@mcp.tool()
def reset_session() -> str:
    # Step 1: Overwrite session.json with the current UNIX timestamp
    SESSION_FILE.write_text(
        json.dumps({"started_at": time.time()}),
        encoding="utf-8"
    )

    return "Success: Focus session timer reset."
How this Tool Works (In Plain English)
When the AI agent executes
reset_session(), Python grabs the exact current timestamp usingtime.time()and overwritessession.json.Any future requests to the
timer://sessionMCP resource will now calculate elapsed minutes from this brand-new starting point.
Core Architecture Rule: State vs. Logs
Notice how our MCP server handles data persistence differently across tools:
| File | Strategy | Why It Matters |
shame_log.txt | Append ("a") | We want permanent historical context so the AI remembers past behavior. |
session.json | Overwrite ("w") | We only care about the current active state, not previous sessions. |
Building an MCP Prompt: Guiding AI Behavior
The final piece of the Model Context Protocol (MCP) puzzle is the MCP Prompt.
If Resources provide Data and Tools provide Actions, Prompts provide Rules. They act as reusable, structured message templates that a client can request to guide the LLM’s behavior for a specific task.
Here is how we set the rules for our focus agent:
@mcp.prompt(name="check-focus", description="Decide if the user needs a break.")
def check_focus() -> str:
    return """
    Rule 1: If active_minutes >= 1, a break is required.
    Rule 2: 1-2 mins = Lofi music. 5+ mins = Energetic music.
    Rule 3: Read the shame history. Be strict if they cheated before.
    Rule 4: NEVER lock the screen or change volume without human approval.
    """
Why Put Prompts in the MCP Server? (The Architecture Secret)
Beginners usually hardcode their system instructions directly inside their LangGraph or LangChain agent code. Don’t do that.
By keeping the prompt inside the MCP server, you create a much cleaner software design. The MCP server doesn’t just expose what data and tools exist—it also provides the exact instruction manual on how the AI should use them.
How the Data Flows :
Instead of scattering behavioral rules all over your code, the flow becomes simple and modular:
Request:
agent.pyasks the MCP Server for thecheck-focusprompt.Transfer: The agent sends those exact rules to the Groq LLM as a system message.
Execution: The AI reads the rules and makes a highly accurate, safe decision.
This keeps your main AI agent lightweight, modular, and incredibly easy to debug!
Running the Python MCP Server via stdio Transport
Now that our Resources, Tools, and Prompts are defined, we need to launch the server so an AI agent can connect to it.
Here is the final block of code in server.py:
if __name__ == "__main__":
    # Start the FastMCP server and listen for incoming client connections
    mcp.run()
How the Server Communicates :
The Entry Point: The
if __name__ == "__main__":guard ensures the server starts only whenserver.pyis executed directly as a script.mcp.run(): This boots up FastMCP and opens thestdio(Standard Input/Output) transport. Instead of exposing insecure open ports on the internet, your AI agent talks directly to this Python process locally through system input/output pipes.
The Agent-to-Server Relationship :
In Part 2, our agent.py script will launch this server as a local background process (python -m mcp_server.server) and interact with it over stdio:
agent.py (The Brain - LangGraph + Groq)
   │
   │ Launches & communicates via stdio transport
   ▼
server.py (The Hands & Eyes - FastMCP Server)
   ├── 📖 Reads Resources: Timer state, shame history, song catalog
   ├── 🧠 Reads Prompts: Focus break decision rules
   └── ⚡ Executes Tools: Windows volume, YouTube, screen locking
Key Takeaway: Your MCP server is completely decoupled from the AI model. It does not contain LLM logic or API keys—it simply provides clean, secure capabilities that any AI agent can safely plug into!
The Complete Server Data Flow
Now step back from individual functions.
This is what server.py really does:
SERVER STARTS
     ↓
Create data/ if needed
     ↓
Create shame_log.txt if needed
     ↓
Create session.json with started_at
     ↓

Expose MCP Resources
     │
     ├── timer://session
     ├── shame://log
     └── songs://catalog

Expose MCP Prompt
     │
     └── check-focus

Expose MCP Tools
     │
     ├── set_volume
     ├── play_song
     ├── write_shame_log
     ├── reset_session
     └── lock_screen
Notice something important:
The server itself does not decide whether you deserve a break.
It does not call Groq.
It does not build a LangGraph.
It does not ask for human approval.
It simply provides a clean set of capabilities and context.
Why This MCP Server Design Matters ?
This small Pomodoro project isn’t just a fun desktop toy. It demonstrates the exact Model Context Protocol (MCP) architecture used to build massive, production-grade enterprise AI agents.
The underlying logic is identical; we are simply swapping out enterprise APIs for local Windows automation.
Think about how this scales to a real company:
Resources (The Data): Instead of a local
timer://session, an enterprise MCP server exposes live CRM data likecustomer://123orinventory://current.Tools (The Actions): Instead of
lock_screen(), the AI agent uses tools likerefund_order()orcreate_support_ticket().Prompts (The Rules): Instead of our
check-focusprompt, the server provides a strictrefund-policyprompt to guide the AI’s behavior.
By building this project, you aren’t just learning how to write Python decorators. You are mastering the most critical rule of scalable AI automation: The Separation of Concerns.
You now know how to securely divide a system into five distinct layers:
DATA (MCP Resources)
ACTIONS (MCP Tools)
AI INSTRUCTIONS (MCP Prompts)
WORKFLOW LOGIC (LangGraph Agent – Coming in Part 2!)
HUMAN AUTHORITY (Human-in-the-Loop Safety)
What Happens in Part 2?
Our MCP toolbox is ready.
Now we need intelligence.
In Part 2, we will build the LangGraph agent that:
reads MCP resources
      ↓
checks whether a break is required
      ↓
fetches the MCP prompt
      ↓
asks Groq for a structured song decision
      ↓
pauses for human approval
      ↓
lets the user override the song
      ↓
asks whether to loop it
      ↓
searches YouTube with yt-dlp
      ↓
calls MCP tools
      ↓
resets the session
      ↓
locks Windows
The workflow also uses LangGraph’s interrupt() and Command(resume=...) system so execution can genuinely pause and resume around human decisions.
And that is where this MCP server stops being a collection of functions and becomes part of a real Human-in-the-Loop agentic workflow.


[…] Part 1, we built the MCP Server (the toolbox). It has powerful capabilities—like reading your focus […]