Learn how to build a real AI agent using LangGraph, MCP, and Groq. Master state management, Human-in-the-Loop (HITL) approvals, and Python tool execution.
In Part 1, we built the MCP Server (the toolbox). It has powerful capabilities—like reading your focus timer, locking Windows, and playing YouTube videos—but it has no idea when to actually do these things.
Now, we are building agent.py (the brain).
In this second part, we will build a LangGraph + Groq AI agent that controls the MCP server. You will learn how to:
Read MCP Resources to give the AI context.
Add Human-in-the-Loop (HITL) checkpoints so the AI pauses to ask for your permission.
Let the user override the AI’s choices.
Search YouTube directly (without needing a paid API key).
Safely execute MCP Tools only after the human says “Yes.”
The final workflow looks like this:
Read MCP context
       ↓
Need a break?
   ↙       ↘
 No         Yes
 ↓           ↓
END      Ask Groq
              ↓
       Recommend song
              ↓
       Human approval
        ↙          ↘
     Reject       Approve
       ↓             ↓
   Write log    Choose song
                     ↓
                  Loop?
                     ↓
             Search YouTube
                     ↓
              Set volume
                     ↓
              Open video
                     ↓
              Reset timer
                     ↓
              Lock screen
                     ↓
                    END
This is where Resources, Tools, Prompts, state, LLM reasoning, routing, and Human-in-the-Loop finally become one agentic workflow.
Start with the Imports
The imports at the top of our agent.py file reveal exactly how this AI workflow operates. Instead of writing one messy script, we are splitting the architecture into specialized jobs.
Here is the complete import block:
import asyncio
import json
import os
import sys
from pathlib import Path
from typing import TypedDict, Literal
from urllib.parse import urlparse, parse_qs

from dotenv import load_dotenv
from pydantic import BaseModel
from yt_dlp import YoutubeDL

from langchain_groq import ChatGroq

from langgraph.graph import StateGraph, START, END
from langgraph.types import interrupt, Command
from langgraph.checkpoint.memory import InMemorySaver

from mcp import ClientSession, StdioServerParameters
from mcp.client.stdio import stdio_client
What Do These Libraries Do?
We don’t need to overcomplicate this. Here is the exact role of each major package:
ChatGroq: The brain. It handles the LLM reasoning and decision-making.langgraph(StateGraph,interrupt,Command): The workflow engine. It builds the graph, routes logic, and pauses/resumes the agent for human input.InMemorySaver: The memory bank. It saves the graph’s state (checkpoints) when the workflow pauses for human approval.mcp(stdio_client): The hands and eyes. It connects our agent to the local MCP server we built in Part 1.yt_dlp: A smart helper to search YouTube directly without needing a Google API key.
The Golden Rule: Separation of Concerns
Notice the beautiful architecture happening here:
Groq ➔ Handles reasoning.
LangGraph ➔ Controls the workflow.
MCP Server ➔ Provides capabilities and actions.
The Human ➔ Grants permission.
Nobody is stepping on anyone else’s toes. This is the exact blueprint for building scalable, production-ready AI agents!
Load Environment Variables and Project Path
To start, our Python AI agent needs two things: secure API keys and the exact folder path to successfully launch the MCP server.
Here is the initial setup code:
load_dotenv()
BASE_DIR = Path(__file__).resolve().parent.parent
How This Works :
1. Hiding API Keys with load_dotenv() This command securely loads your .env file into your system’s environment variables. This keeps sensitive data—like your GROQ_API_KEY and GROQ_MODEL—hidden and out of your public code.
2. Finding the Root Path Dynamically Instead of hardcoding a messy path like C:/Users/name/project, we use Python’s Path library to find the project root automatically.
If your project looks like this:
focus-break-ai/
└── agent/
    └── agent.py  <-- You are here
The code Path(__file__).resolve().parent.parent takes two steps backward:
.parent(Step 1): Steps out ofagent.pyand into theagent/folder..parent(Step 2): Steps out of theagent/folder and into the mainfocus-break-ai/root folder.
Why is this so important?
Because the LangGraph agent needs to run the MCP Server from the correct working directory. By dynamically finding the root folder, your code will work flawlessly on any computer—whether it is a Windows laptop, a Mac, or a cloud server!
Two Crucial Settings for Testing Your AI Agent
To make testing our LangGraph workflow fast and painless, we use two simple configuration variables in our Python code:
BREAK_THRESHOLD_MINUTES = 1
SCREEN_LOCK_DELAY_SECONDS = 15
Why do we need these?
1. The Fast-Forward Timer (BREAK_THRESHOLD_MINUTES) Waiting an entire hour just to see if your code works is a developer’s nightmare. We set the break threshold to 1 minute for testing purposes. Once your AI agent is ready for the real world, you simply change this to 60 minutes.
2. The Browser Buffer (SCREEN_LOCK_DELAY_SECONDS) If the AI locks your Windows screen the exact millisecond it opens YouTube, the browser won’t have enough time to load the video. Adding a 15-second delay guarantees the song actually starts playing before the workstation locks.
How agent.py Starts the MCP Server
This is the most critical block of code in the project: telling our LangGraph agent how to launch and talk to our Python MCP server.
We do this using StdioServerParameters:
server_params = StdioServerParameters(
    command=sys.executable,
    args=["-m", "mcp_server.server"],
    cwd=str(BASE_DIR),
)
What This Code Does :
command=sys.executable: This tells the agent to use the exact same Python virtual environment it is currently running in.args: This simply runs your server file in the terminal (like typingpython -m mcp_server.server).cwd: This sets the working directory to your project’s root folder.
The Power of stdio Transport :
Instead of setting up complex web hosting, our AI agent and MCP server communicate directly as two local processes talking through a secure pipe (standard input/output, or stdio).
Think of two people in separate rooms communicating through a pipe in the wall:
agent.py (The AI Brain) ↓ talks via stdio pipes server.py (The MCP Actions).
LangGraph State: The Agent’s Shared Notebook
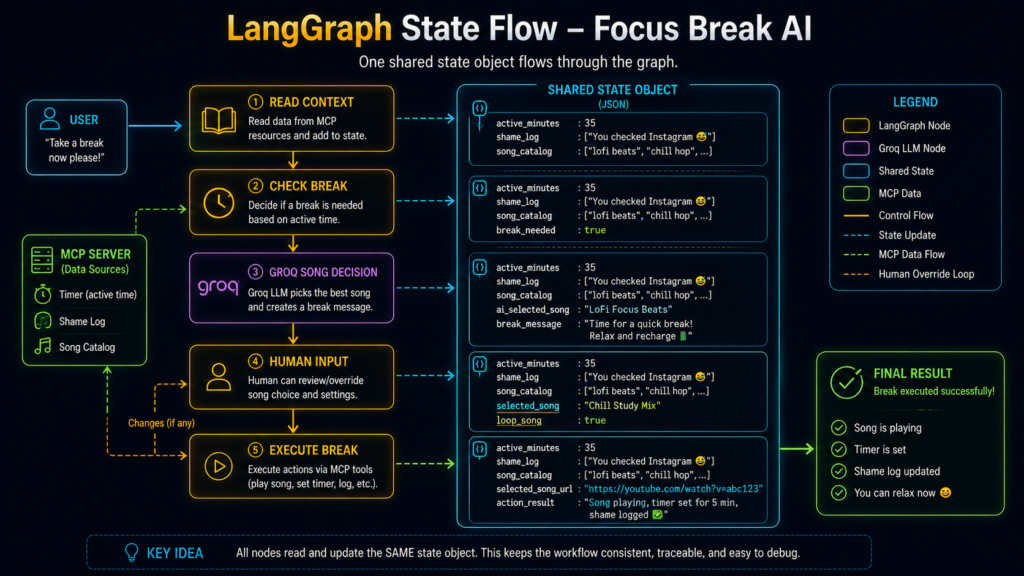
In LangGraph, the State acts like a shared clipboard passed between coworkers (nodes). Every step in your AI workflow reads data from previous steps, adds new data, and passes it forward.
Here is the exact Python TypedDict that manages our agent’s memory:
class FocusState(TypedDict):
    active_minutes: int
    shame_log: str
    song_catalog: dict
    break_needed: bool

    # Song Selection Data
    ai_selected_song: str
    selected_song: str
    selected_song_url: str
    user_song_name: str

    # Workflow Status
    loop_song: bool
    break_message: str
    approved: bool
    action_result: str
How the State Flows :
Instead of starting from scratch, each node builds on the shared state:
Node 1 (MCP Context) writes:
active_minutes = 4Node 2 (Router) adds:
break_needed = TrueNode 3 (Groq LLM) adds:
ai_selected_song = "Bollywood Energy"
The Secret to Human-in-the-Loop (HITL) :
Notice that we have two separate fields: ai_selected_song and selected_song. Why both?
Because an AI’s recommendation and your final choice are not always the same!
AI: “You seem stressed. Let’s play Chill Lofi.”
Human: “Nope. Play Metallica.”
By keeping these fields separate, we allow the human to safely override the AI’s decision. This tiny architectural detail is what makes genuine Human-in-the-Loop (HITL) AI agents possible.
Force Groq to Return Predictable Output
If you ask a standard AI for a song choice, it might reply: “Hmm, maybe some chill lofi would be nice today :)”
That is great for a chat window, but terrible for a Python script. Our code cannot easily parse a friendly conversation. To fix this, we use a Pydantic BaseModel to force the Groq LLM to return strict, predictable data.
Here is how we lock down the AI’s response:
from pydantic import BaseModel
from typing import Literal

# 1. Define the strict output structure
class SongDecision(BaseModel):
    # 'Literal' forces the AI to choose exactly one of these 4 options—no making up words!
    song_key: Literal["lofi", "bollywood", "metal", "fun"]
    message: str

# 2. Configure the Groq LLM
llm = ChatGroq(
    api_key=os.getenv("GROQ_API_KEY"),
    model=os.getenv("GROQ_MODEL", "openai/gpt-oss-120b"),
    temperature=0.2, # Low temperature = strict logic
)

# 3. Wrap the LLM to guarantee structured output
decision_llm = llm.with_structured_output(SongDecision)
How Structured Output Works :
Instead of hoping the AI writes something we can use, with_structured_output() guarantees the response matches our exact blueprint.
Unstructured Chaos: “I think lofi might work for you right now.”
Structured Output:
{"song_key": "lofi", "message": "Take a break."}
Why temperature=0.2?
LLM temperature controls creativity. A high temperature (e.g., 0.8) makes the AI creative like a poet. A low temperature (0.2) makes it focused, predictable, and logical. Since our LangGraph agent is making system decisions, we want strict logic, not poetry!
Reading MCP Resources into the LangGraph Agent
Remember our golden rule from Part 1? Resource = READ.
It is time for our AI agent to connect to the server and fetch the context it needs to make decisions.
Here is the Python function that handles the connection and data retrieval:
async def _read_mcp_context():
    # Step 1: Connect via stdio and initialize the MCP session
    async with stdio_client(server_params) as (read_stream, write_stream):
        async with ClientSession(read_stream, write_stream) as session:
            await session.initialize()

            # Step 2: Request the MCP Resources (Internal URIs, not websites)
            timer_result = await session.read_resource("timer://session")
            shame_result = await session.read_resource("shame://log")
            song_result = await session.read_resource("songs://catalog")

            # Step 3: Translate the JSON text back into Python dictionaries
            timer_data = json.loads(get_mcp_text(timer_result))
            songs = json.loads(get_mcp_text(song_result))

            # Step 4: Return perfectly formatted data for LangGraph
            return {
                "active_minutes": timer_data["active_minutes"],
                "shame_log": get_mcp_text(shame_result),
                "song_catalog": songs,
            }
How the Data Fetch Works :
The Handshake: We start the
stdioconnection, create an MCPClientSession, and initialize it. You must initialize before you can request data!The URIs: Identifiers like
timer://sessionlook like web links, but they are purely internal MCP Resource IDs.The JSON Translation: When the MCP server sends data, it arrives as raw text. We use a simple helper (
get_mcp_text) and Python’s built-injson.loads()to instantly translate that text back into usable Python dictionaries.
The Result: What started as raw server context has now been successfully converted into LangGraph-ready state data!
Node 1: Injecting MCP Data into LangGraph State
Our first graph node is intentionally tiny. Its only job is to fetch data from our MCP server and push it into the LangGraph state.
def read_context(state: FocusState):
    # Fetch MCP data and wait for the result
    data = asyncio.run(_read_mcp_context())
    return data
The asyncio Bridge (In Plain English)
Why do we use asyncio.run()? MCP server communication uses Python’s asynchronous features (like await session.read_resource()). However, our LangGraph node is a standard, synchronous function.
asyncio.run() acts as a bridge: it pauses the normal function, runs the async MCP task, waits for it to finish, and returns the result (like active_minutes and shame_log). LangGraph then automatically merges this data into the agent’s shared state.
Node 2 & Routing: Deterministic Rules vs. LLM Logic
Next, the agent must decide if you actually need a break.
def check_break(state: FocusState):
    # Simple math check
    break_needed = state["active_minutes"] >= BREAK_THRESHOLD_MINUTES
    return {"break_needed": break_needed}
A Crucial AI Architecture Rule: Don’t Overuse the LLM
Notice that we do not use the Groq LLM here. This is a vital agent-design principle: Use deterministic code for strict rules, and save the LLM for actual reasoning. If your business logic is simple math (minutes >= threshold), forcing an AI model to calculate it just adds unnecessary complexity and latency.
The LangGraph Router :
Now that we have our break_needed answer, we use a router function to direct traffic:
def route_break(state: FocusState):
    if state["break_needed"]:
        return "choose_song"
    return "end"
A router does not execute any actual tasks; it is simply a traffic cop that chooses the next road:
break_needed = False➔ Routes toEND(The workflow stops).break_needed = True➔ Routes tochoose_song(The AI takes over).
Fetching the MCP Prompt (The AI Rulebook)
MCP Prompts do not execute code. They are simply reusable sets of instructions stored on your server.
Our agent retrieves the check-focus prompt from the MCP server to use as the System Message for the Groq LLM. This prompt gives the AI strict behavioral guidelines:
1–2 mins: Recommend Lofi music.
3–4 mins: Recommend Bollywood or Fun music.
5+ mins: Recommend Heavy, Energetic music.
Safety Rule: Do not perform OS actions without human approval.
Architecture Pro-Tip: The prompt provides guidance, but our LangGraph workflow provides the actual enforcement. We never blindly trust the LLM to behave; the workflow itself stops for human permission!
Node 3: Groq LLM Makes the Recommendation
Now, we bring the logic together in our choose_song node. We combine the static rules from MCP with the dynamic data from our LangGraph state, and pass both to Groq.
def choose_song(state: FocusState):

    # Step 1: Get the static rules from MCP (System Message)
    mcp_prompt = asyncio.run(_get_focus_prompt())

    # Step 2: Build the dynamic runtime context (User Message)
    user_context = f"""
    Active minutes: {state['active_minutes']}
    Previous shame history: {state['shame_log']}
    Available song categories: {json.dumps(state['song_catalog'], indent=2)}
    Choose exactly one song_key.
    """

    # Step 3: Call Groq LLM for a structured JSON decision
    decision = decision_llm.invoke([
        ("system", mcp_prompt),
        ("user", user_context),
    ])

    # Step 4: Map the chosen key (e.g., "bollywood") to the actual song name
    ai_song_name = state["song_catalog"][decision.song_key]["name"]

    # Step 5: Update the LangGraph State
    return {
        "ai_selected_song": ai_song_name,
        "selected_song": ai_song_name, # The human can override this next!
        "break_message": decision.message,
    }
How the LLM Brain Works :
Separation of Context: We cleanly separate the AI’s core instructions (System Message) from the constantly changing session data (User Message). The rules stay reusable; the data stays dynamic.
Structured AI Decisions: Groq evaluates your
active_minutesand reads yourshame_log. If you ignored your last break, Groq gets strict, picks an energetic song category, and generates a custom message telling you to step away.Drafting the Final Choice: We save Groq’s choice into
ai_selected_songand copy it toselected_song.
Why just a copy? Because in the very next step, our Human-in-the-Loop checkpoint kicks in, giving the user the ultimate power to override the AI’s music choice!
Human-in-the-Loop (HITL) #1: Pausing the LangGraph Agent
Here is where our AI stops acting like a runaway script. We use LangGraph’s powerful interrupt() function to physically pause the workflow and wait for human permission.
# Pause the workflow and pass a question to the user
answer = interrupt({
    "type": "break_approval",
    "question": "Break start karu? (y/n)",
    "message": state["break_message"],
    "ai_song": state["ai_selected_song"],
})

# Normalize the user's answer (y, yes, true, 1 all become True)
approved = str(answer).strip().lower() in {"y", "yes", "true", "1"}
How interrupt() Creates a Safety Boundary
This function does not just print a question—it completely suspends graph execution and hands control back to your outer application.
If the human rejects the break, the agent routes to the end. No volume change. No browser. No locked screen. That is exactly where the safety boundary belongs in any AI workflow!
HITL #2: Overriding the AI’s Choice
If you approve the break, the agent asks for a song.
# The user can type a song like "Believer Imagine Dragons" or leave it blank
user_song_name = str(answer).strip()

if user_song_name:
    final_song_name = user_song_name           # Human typed something -> Use Human choice
else:
    final_song_name = state["ai_selected_song"] # Human pressed Enter -> Use AI choice
AI as Default, Human as Authority
The AI provides a smart default (e.g., Chill Lofi), but the human can effortlessly override it by typing a custom request.
HITL #3: Steering Execution Parameters
The final interruption asks if the song should play on a loop, saving the y/n answer as a clean Boolean (True or False) in the LangGraph state.
The Big HITL Takeaway :
Three separate interruptions might look excessive for a tiny Pomodoro demo, but they teach developers a massive architectural lesson:
Human-in-the-Loop is not limited to simple “Approve/Reject” buttons. True HITL allows humans to actively modify parameters and steer the AI’s execution path before any external MCP tools are allowed to run.
Python YouTube Search with yt-dlp
There is a slight problem: If you tell the AI to play “Believer Imagine Dragons”, our MCP play_song() tool will crash. The tool strictly requires a formatted web URL ([https://www.youtube.com/watch?v=](https://www.youtube.com/watch?v=)...), not raw text.
We need a transformation layer in our LangGraph agent to bridge this gap. We will use the powerful yt-dlp Python library.
# Step 1: Configure yt-dlp to scrape metadata ONLY
options = {
    "skip_download": True, # Crucial: We only want text, not video files!
    "extract_flat": True,
    "quiet": True
}

# Step 2: Use "ytsearch1:" to fetch the top YouTube result instantly
result = ydl.extract_info(f"ytsearch1:{clean_name}", download=False)

# Step 3: Extract the Video ID and build the playable URL
video_id = video.get("id")
direct_url = f"https://www.youtube.com/watch?v={video_id}"
How the Transformation Pipeline Works :
skip_download = True: We tell Python to only grab the search metadata. We are not downloading heavy audio or video files.ytsearch1:: This is a magic keyword inyt-dlp. It tells the library to search YouTube and grab exactly one top result for your query.The Data Flow: Human types “Believer” ➔
ytsearch1:➔ Extracts Video ID ➔ Builds thehttps://...URL ➔ Sends to the MCP Tool.
💡Developer Pro-Tip: Because
yt-dlpscrapes metadata directly, you do not need to set up a messy Google Cloud YouTube Data API key to make this AI agent work. It is 100% free and ready to run locally!
Generating YouTube Autoplay & Loop URLs in Python
Once we have the YouTube link from yt-dlp, we need to format it based on the user’s loop preference.
First, our Python helper function extracts the raw Video ID (like ABC123) from any standard YouTube link format (including youtu.be, shorts, and embeds). Then, we build the final URL:
Standard Autoplay:
[https://www.youtube.com/watch?v=ABC123&autoplay=1](https://www.youtube.com/watch?v=ABC123&autoplay=1)Loop Mode:
[https://www.youtube.com/embed/ABC123?autoplay=1&loop=1&playlist=ABC123](https://www.youtube.com/embed/ABC123?autoplay=1&loop=1&playlist=ABC123)
💡 Developer Pro-Tip: Why add
playlist=ABC123to loop a single video? YouTube’s embed player strictly requires the video ID to be set as its own playlist for theloop=1parameter to actually work! (Keep in mind: strict browser policies may still block auto-playing audio without a manual click).
Executing the MCP Tools (The Action Phase!)
Our LangGraph workflow has finally gathered everything: the break is approved, the song is chosen, and the final YouTube URL is ready.
Now, the agent commands the MCP Server to execute the physical tools we built in Part 1:
# 1. Set Windows OS volume to 50%
await session.call_tool("set_volume", {"level": 50})

# 2. Open the YouTube URL in the default web browser
await session.call_tool("play_song", {"song_url": song_url})

# 3. Wait 15 seconds to let the browser load the video
await asyncio.sleep(SCREEN_LOCK_DELAY_SECONDS)

# 4. Reset the focus session timer to zero
await session.call_tool("reset_session", {})

# 5. Lock the Windows workstation LAST!
await session.call_tool("lock_screen", {})
Why Execution Order is Crucial ?
In OS automation, sequence is everything. If you lock the screen first, the browser might fail to open properly in the background, making the whole workflow awkward.
Handling OS Failures Gracefully :
Operating system actions can randomly fail. This perfectly highlights why we used try/except blocks inside our MCP Server in Part 1. If the screen fails to lock, the MCP tool returns a clean error string to the LangGraph agent instead of crashing the entire Python server process.
(Note: Because this execution relies on pycaw, os.startfile, and ctypes.windll, these specific physical tools are Windows-only).
The execute_break Node: Firing the MCP Tools
This is the climax of our AI agent workflow. The execute_break node takes all the data we’ve gathered—AI recommendations, human overrides, and parameter choices—and actually performs the desktop automation.
Here is the streamlined logic:
def execute_break(state: FocusState):
    # Step 1: Search YouTube for the final song choice
    try:
        resolved_title, direct_url = resolve_song_to_youtube_url(state["selected_song"].strip())
    except Exception as error:
        # Graceful Failure: Stop execution if the search fails
        return {"action_result": f"Search failed: {error}"}

    # Step 2: Apply the human's loop or autoplay preference
    final_url = make_youtube_loop_url(direct_url) if state["loop_song"] else make_autoplay_url(direct_url)

    # Step 3: Trigger the MCP Server to run the desktop tools
    asyncio.run(_execute_break_tools(final_url))

    return {"action_result": f"'{resolved_title}' opened. Break activated!"}
The AI Agent Data Flow :
Look at the incredible data transformation that just happened effortlessly: AI Category ➔ Human Override ➔ yt-dlp Search ➔ Video ID ➔ Loop URL ➔ MCP play_song Tool ➔ Windows Browser.
Notice the try/except block. This ensures Graceful Failure. If the YouTube search breaks, the agent returns an error instead of blindly trying to open a broken link and crashing the system.
What Happens If the User Rejects the Break?
What happens if the human hits No during the Human-in-the-Loop approval phase? We route to the rejected node.
Instead of just quietly closing, the agent actively records this behavior using the write_shame_log MCP tool.
def rejected(state: FocusState):
    # Connect to MCP server and write the rejection to the text file
    asyncio.run(_write_rejection_log())

    return {"action_result": "Break rejected. Shame log updated."}
This simple rejection node creates a powerful AI feedback loop:
Today: You reject the break. The MCP server writes this to
shame_log.txt.Tomorrow: The LangGraph agent reads the
shame_log.txtResource.Result: The Groq LLM sees you cheated yesterday, so it generates a much stricter, bossier message today!
By saving state externally, yesterday’s human action becomes tomorrow’s AI context. This is how you build AI agents that feel like they have long-term memory!
Build the LangGraph
Now all our Python functions become graph nodes:
builder = StateGraph(FocusState)

builder.add_node(
    "read_context",
    read_context
)

builder.add_node(
    "check_break",
    check_break
)

builder.add_node(
    "choose_song",
    choose_song
)

builder.add_node(
    "approve_break",
    approve_break
)

builder.add_node(
    "ask_song",
    ask_song
)

builder.add_node(
    "ask_loop",
    ask_loop
)

builder.add_node(
    "execute_break",
    execute_break
)

builder.add_node(
    "rejected",
    rejected
)
A node is simply a unit of work. But nodes alone are just islands. Edges tell LangGraph how to travel between them.
LangGraph Routing: Normal vs. Conditional Edges
To connect our LangGraph nodes, we use Edges. Think of edges as the roads connecting the different steps (nodes) in your AI workflow.
There are two ways to route traffic in LangGraph:
1. Normal Edges (The Straight Path)
If a step must always happen in a specific order, we use a standard, unconditional edge. There is only one destination.
# The workflow ALWAYS goes from START to reading the MCP context
builder.add_edge(START, "read_context")
builder.add_edge("read_context", "check_break")
2. Conditional Edges (The Brain of the Agent)
When the workflow needs to make a dynamic choice based on the agent’s current state, we use Conditional Edges. This is where your AI agent’s decision-making power lives.
# The 'route_break' function checks the state and decides the next destination
builder.add_conditional_edges(
    "check_break",
    route_break,
    {
        "choose_song": "choose_song", # Path A: Time for a break
        "end": END                    # Path B: Keep working
    }
)
The AI Workflow Logic :
Even though our LangGraph architecture seems complex, the agent only makes two actual decisions in the entire workflow:
Decision 1: Do we need a break? (Checks the timer state)
Decision 2: Did the human approve it? (Checks the HITL state)
Everything else is a completely predictable, hard-coded sequence. Mixing dynamic conditional routing with strict normal edges is the secret to building AI agents that are both smart and easy to debug!
LangGraph Checkpointers: The Secret to Human-in-the-Loop
When you use interrupt() to pause an AI workflow, LangGraph needs a way to remember exactly where it stopped, what the state was, and where to resume. Without a Checkpointer, managing a paused workflow is impossible.
# Use InMemorySaver to store graph state in local memory
memory = InMemorySaver()
graph = builder.compile(checkpointer=memory)
nMemorySaver keeps your graph state in RAM. If your Python script closes, the memory resets. It is perfect for local tutorials, but for production AI agents, you would swap this out for a permanent database (like Postgres or Redis).
Initial State and the thread_id “Save Slot”
Before we start the graph, we need to pass in our starting data (mostly empty placeholders) and a specific thread_id configuration.
# 1. Define the starting placeholders
initial_state = {
    "active_minutes": 0,
    "break_needed": False,
    # ... other empty fields wait for the agent to fill them
}

# 2. Assign a unique thread ID
config = {"configurable": {"thread_id": "focus-session-1"}}
Why thread_id Matters :
Think of the thread_id as a “Save Game” slot on a console. When the workflow pauses for human approval, it saves its progress in focus-session-1. Later, when you finally type your answer, we pass that exact same thread_id back to LangGraph so it knows exactly which paused conversation to wake up and resume!
Starting the Graph and Catching the Interrupt
Now, we finally pull the trigger and start the AI agent:
# Launch the LangGraph workflow!
result = graph.invoke(initial_state, config=config)
How LangGraph Executes ?
Once invoked, the graph starts at START and races through the nodes until one of two things happens:
It reaches the
ENDnode.It hits our
interrupt()function.
If it hits our Human-in-the-Loop pause, the result dictionary will spit back a special key called "__interrupt__". And that brings us to the most clever piece of Python logic in our entire application…
Resuming the LangGraph Agent with Command(resume=...)
When our workflow hits an interrupt(), the graph pauses and returns a special "__interrupt__" state. Our main application uses a while loop to catch these pauses, ask the human the correct question, and feed the answer back into the AI agent.
Here is the code that handles this interaction:
# Keep looping as long as the AI workflow is paused
while "__interrupt__" in result:

    # Step 1: Extract the payload we passed into the interrupt() function
    data = result["__interrupt__"][0].value

    # Step 2: Ask the user the correct question via the CLI
    if data["type"] == "break_approval":
        answer = input("\nBreak start karu? (y/n): ")
    elif data["type"] == "song_choice":
        answer = input("\nSong name likho (Press ENTER for AI choice): ")
    elif data["type"] == "loop_choice":
        answer = input("\nLoop mein chalana hai? (y/n): ")

    # Step 3: THE MAGIC LINE - Inject the human answer back into the graph
    result = graph.invoke(Command(resume=answer), config=config)
The Magic of Command(resume=...):
We are not restarting the graph with a new initial state.
Instead, Command(resume=answer) tells LangGraph to wake up the exact paused node and inject the human’s text directly into the interrupt() variable that was waiting for it.
The HITL Lifecycle: Graph Pauses ➔ State is Preserved ➔ Human Types Answer ➔ Graph Resumes Exactly Where It Left Off.
Because our workflow has three potential interruptions (Approval, Song, Loop), this while loop cleanly handles all of them until the agent is ready to move forward.
The Final Execution and Output
Once all human interruptions are resolved and the MCP tools have executed, the LangGraph reaches the END node. The while loop finishes, and we simply print the final result to the terminal:
# Print the final outcome of the agent's workflow
print(result.get("action_result", "Workflow completed."))

if __name__ == "__main__":
    main()
What the User Sees
Instead of dumping raw JSON logs, the agent cleanly summarizes the entire Human-in-the-Loop workflow with a single, readable sentence:
” ‘Believer Imagine Dragons’ opened on YouTube and forced break activated.”
” Break rejected. Shame log updated.”
The Entire Project in One Data Journey
Now forget the individual functions for a moment.
Here is what really happens when the program runs:
agent.py starts
      ↓
Launch MCP server through stdio
      ↓
Read timer://session
Read shame://log
Read songs://catalog
      ↓
Store data in LangGraph state
      ↓
Check deterministic break threshold
      ↓
No break → END

OR

Break required
      ↓
Fetch check-focus MCP Prompt
      ↓
Combine prompt + runtime state
      ↓
Send to Groq
      ↓
Structured SongDecision
      ↓
Human approval interrupt
      ↓
Reject ───────────────→ MCP write_shame_log
      ↓
Approve
      ↓
Human song override interrupt
      ↓
Human loop choice interrupt
      ↓
yt-dlp searches YouTube
      ↓
Song name → video ID → URL
      ↓
Autoplay/loop transformation
      ↓
MCP set_volume
      ↓
MCP play_song
      ↓
wait 15 seconds
      ↓
MCP reset_session
      ↓
MCP lock_screen
      ↓
END
That is a real agentic workflow.
Not because an LLM exists somewhere in the code.
But because several different components cooperate:
MCP Resources provide context.
MCP Prompt provides domain guidance.
Groq makes a bounded AI decision.
LangGraph controls workflow and state.
Humans retain authority.
MCP Tools perform real actions.
Persistent files affect future runs.
And that separation is the biggest lesson of this project.
LangGraph + MCP Simulator
70 mins
{}Our silly little AI that gets annoyed when you refuse a coding break has quietly taught us MCP client-server communication, LangGraph state, structured LLM output, routing, asynchronous tool calls, Human-in-the-Loop interrupts, checkpointing, resume semantics, external search resolution, operating-system automation, and persistent behavioral context.
Not bad for an agent whose main job is basically:
“Enough coding. Go touch grass for five minutes.”
Download the complete source code here (Part 1 + Part 2).


[…] Part 2: Build the LangGraph + MCP Agent — State, Groq Structured Output, Human-in-the-Loop, Routin… […]