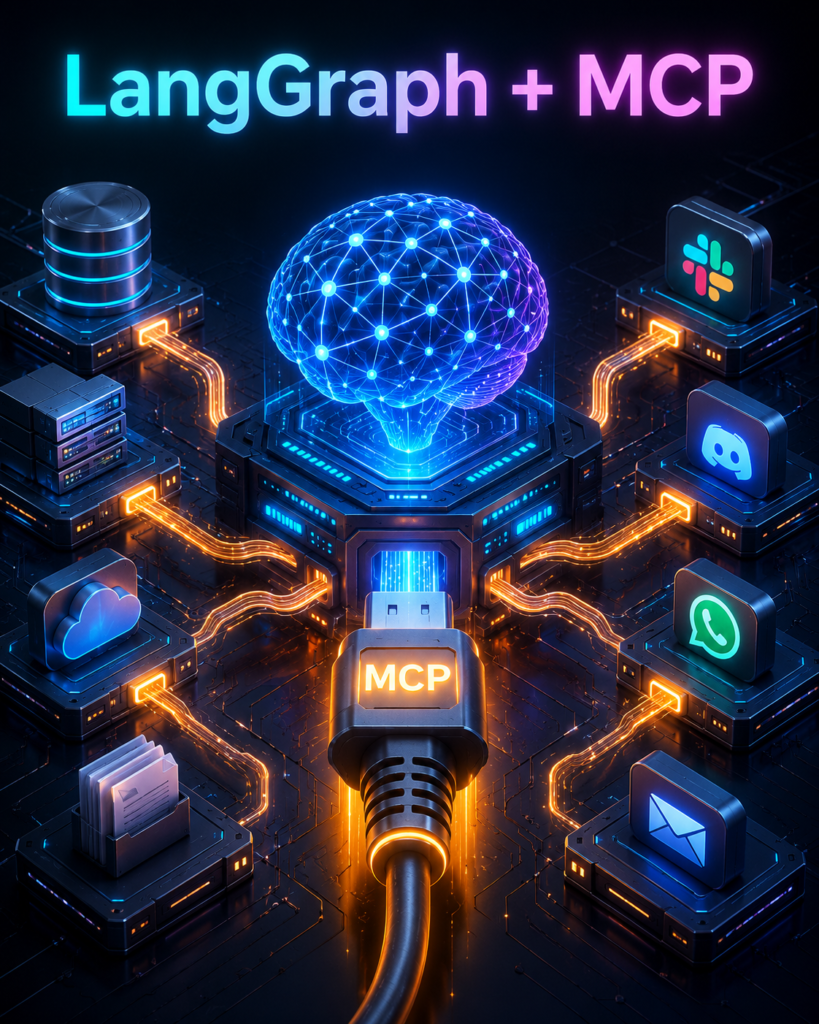
Learn why LangGraph and MCP work so well together, how LangGraph acts as the client, how MCP servers expose tools, and how to connect local and remote systems without custom wrappers.
1. What Are LangGraph and MCP?
Let me explain this like you’re sitting next to me, and I’m walking you through it over chai.
LangGraph – The Brain:
Think of LangGraph as the orchestrator. It’s the thing that decides:
“Okay, first I need to fetch data from GitHub.”
“Now I need to analyze what I got.”
“If it’s urgent, I’ll create a Jira ticket right away.”
“If not, I’ll just save it for later.”
It also remembers things. If the user asks a follow-up question, LangGraph remembers what happened in the previous step. That’s called state, and it’s LangGraph’s superpower.
MCP – The Universal Plug:
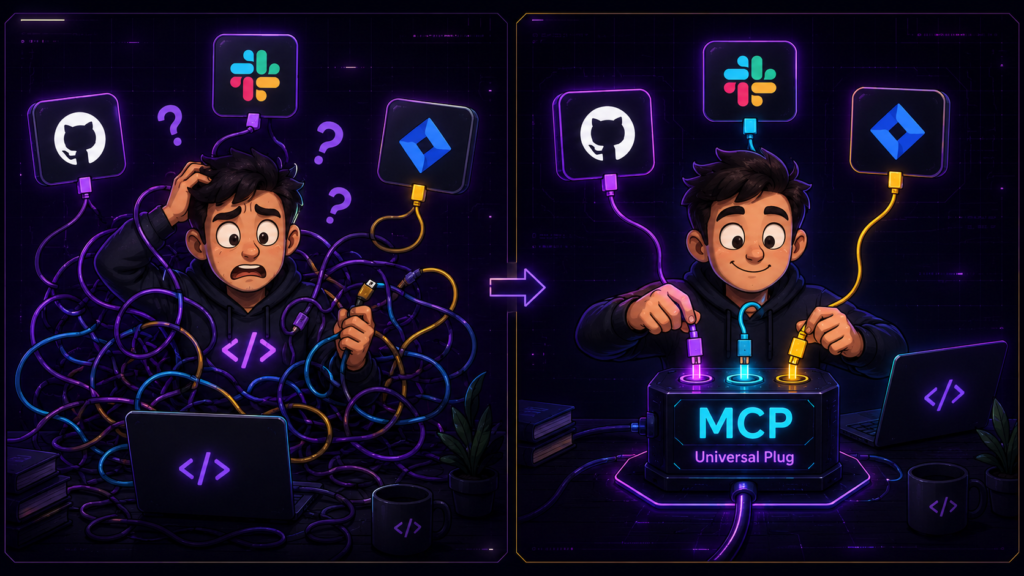
MCP (Model Context Protocol) is a standard way for AI agents to talk to external systems.
Think of it like this: Instead of writing separate code to connect to GitHub, Slack, and Jira, MCP gives you one standard way to connect to all of them.
2. Analogy: The Robotic Arm
Let’s use something I know you’ll get – robotics.
Imagine you’re building a robotic arm for a warehouse. This arm needs to:
Look at items on a conveyor belt
Decide if they’re heavy or light
Pick them up
Wait for a human to approve the drop
Drop them in the right box
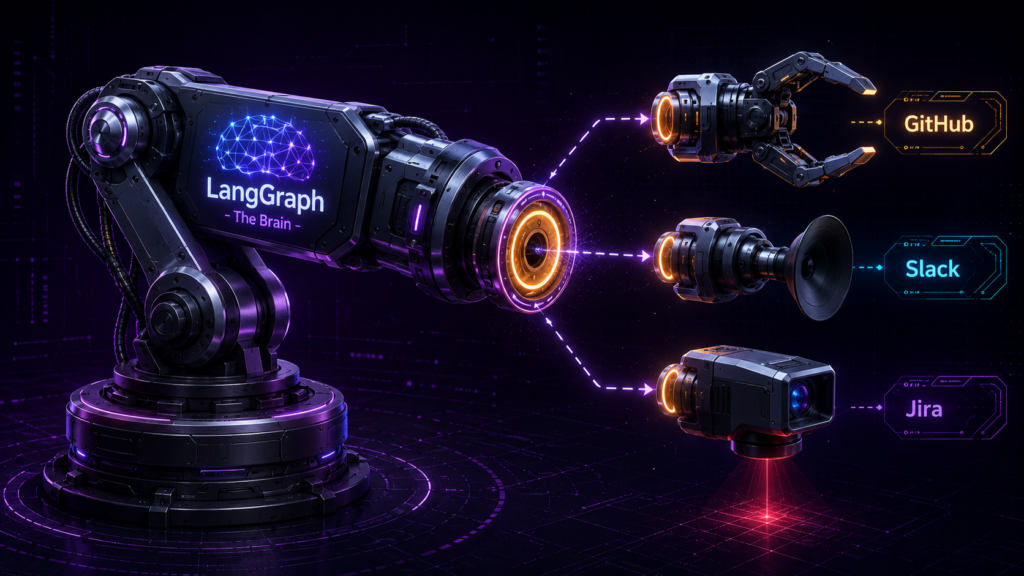
LangGraph is the Microcontroller (The Brain)
LangGraph runs the whole show:
Look at item → Decide if heavy → Pick it up → Wait for approval → Drop it
It handles:
Loops (keep doing this for every item)
Conditional logic (if heavy, use the claw; if light, use the suction cup)
State (remember which items you’ve already processed)
Approval waits (wait for human input before dropping)
MCP is the Standardized Port on the Wrist
Now imagine the wrist of this robotic arm has a universal port.
Instead of hardwiring a claw, a suction cup, and a laser pointer with completely different cables and protocols, you just snap any tool into this port.
Need to grab something heavy? Snap in the claw.
Need to pick up fragile items? Snap in the suction cup.
Need to scan barcodes? Snap in the scanner.
LangGraph doesn’t care what tool is attached. It just knows how to send the “activate” signal through the universal port. When it says “activate claw,” the claw grabs. When it says “activate suction,” the suction activates.
MCP works the same way. LangGraph sends a “call tool” command through MCP. MCP figures out how to talk to GitHub, Slack, or whatever tool is connected. LangGraph doesn’t need to know the details.
3. Why Should You Care?
Here’s the thing that makes developers lose sleep.
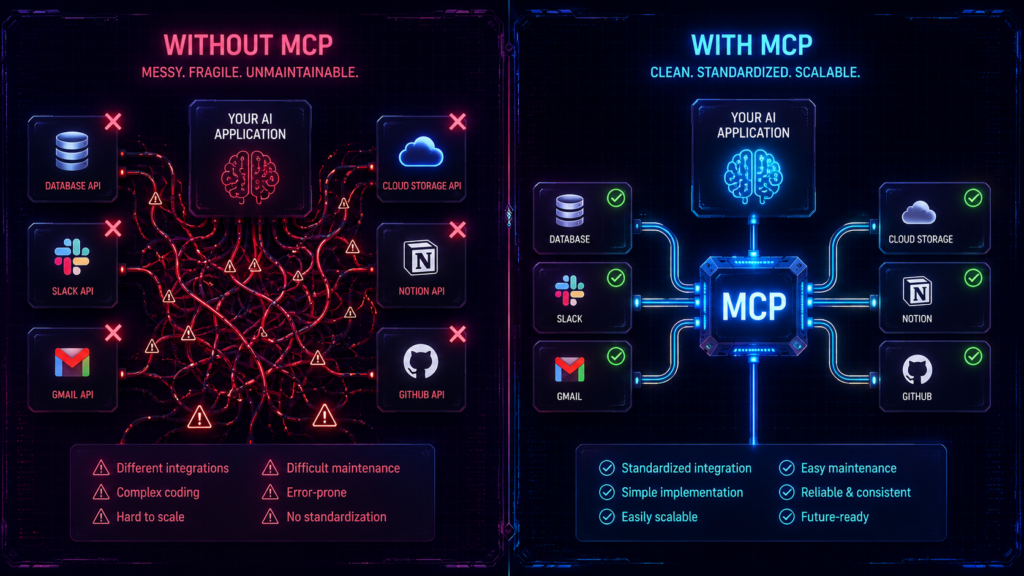
The Nightmare: Without MCP
Imagine you’re building an AI agent that needs to:
Check a GitHub repo for bugs
Create a Jira ticket if a bug is found
Post a Slack message to the team
Query a Postgres database for user data
Send an email report at the end
Without MCP, you’d have to write custom code for EACH system:
# Custom GitHub integration
def get_github_issues(repo):
# 50 lines of GitHub API code
pass
# Custom Jira integration
def create_jira_ticket(title, desc):
# 40 lines of Jira API code
pass
# Custom Slack integration
def send_slack_message(message):
# 30 lines of Slack API code
pass
# Custom Postgres integration
def query_postgres(sql):
# 25 lines of database code
pass
Now multiply this by every project. It becomes:
Maintenance hell (APIs change, your code breaks)
Brittle (one error crashes everything)
Impossible to scale (new system = new 50-line wrapper)
The Solution: With MCP
MCP standardizes how tools are exposed. You connect to an MCP server and get a consistent interface.
Your LangGraph agent just says: “Call tool X with arguments Y.”
MCP handles the rest. It doesn’t matter if it’s GitHub, Slack, or Jira. Same interface. Every time.
4. LangGraph vs MCP: Who Does What?
This is where beginners get confused. Let me make it crystal clear.
| Component | What It Does | Real-World Analogy |
|---|---|---|
| LangGraph | Orchestration, state, routing, loops, memory | The brain/microcontroller |
| MCP | Standardized access to external tools | The universal port on the wrist |
| Together | Smart agent that can actually DO things | A brain that can use any tool |
LangGraph = Orchestration, State, Routing
Orchestration: Decides which step comes next
State: Remembers what happened in previous steps
Routing: If X happens, go to Y; if Z happens, go to W
Loops: Keep doing something until a condition is met
Retries: If something fails, try again with backoff
MCP = Standardized Tool Access
Standardization: One way to talk to all systems
No boilerplate: Don’t write custom wrappers
Consistency: Same interface for GitHub, Slack, Jira, Postgres
Plug and play: Add new tools without changing your agent code
5. When to Use LangGraph + MCP Together ?
Use LangGraph Alone When:
You’re building a simple chatbot with no external integrations
Your workflow is linear (step 1 → step 2 → step 3, no branching)
You don’t need to remember anything between steps
Use MCP Alone When:
You just need to expose tools for a simple script
You’re making single tool calls (not multi-step)
You don’t need orchestration or state
Use BOTH When: (The Sweet Spot)
Your agent needs to remember what happened in previous steps
You have conditional routing (if heavy, use claw; if light, use suction)
You need to connect to multiple external systems
You want retry logic when external calls fail
You need human-in-the-loop approval steps
The bottom line: LangGraph is the brain. MCP is the universal plug. Together, they make an agent that’s both smart AND connected.
6. How to Build It: Step-by-Step
Let’s actually build this thing. I’ll break it down into 5 micro-steps so you don’t get overwhelmed.
Prerequisites
pip install langgraph langchain-mcp-adapters mcp
Step 1: Create an MCP Server (The Tool Provider) {#step1}
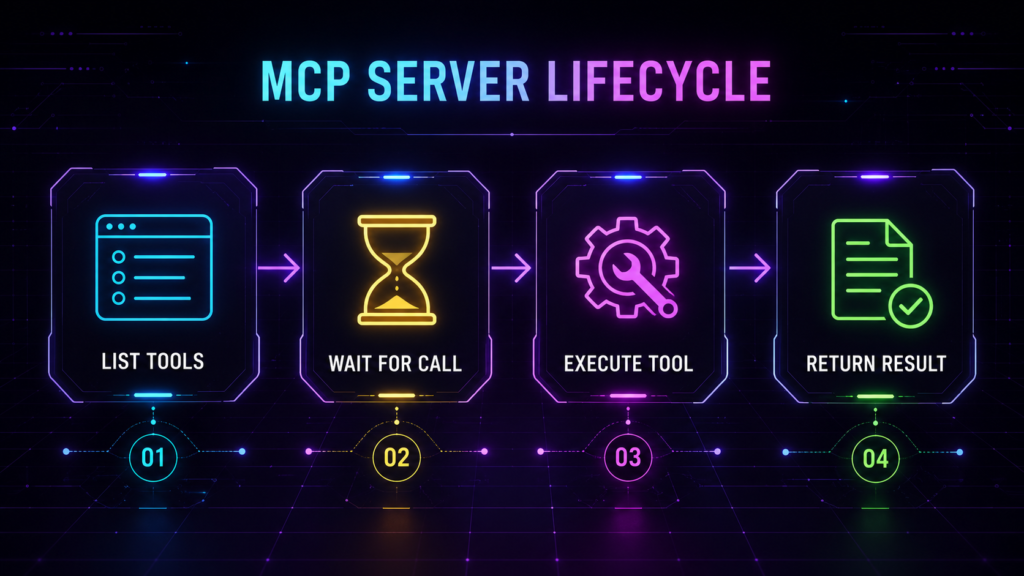
First, you create an MCP server. This is the thing that exposes your tools to the outside world.
Think of it like creating a menu for a restaurant. The server says: “Here are all the things I can do, and here’s how to ask me to do them.”
Create a file called server.py:
# server.py – This is your MCP Server
from mcp.server import Server, stdio_server
from mcp.types import Tool, TextContent
# Create the server
app = Server(“my-tool-server”)
# Step 1: List all available tools
@app.list_tools()
async def list_tools():
return [
Tool(
name=”get_github_issue”,
description=”Fetch details of a GitHub issue”,
inputSchema={
“type”: “object”,
“properties”: {
“repo”: {“type”: “string”},
“issue_number”: {“type”: “number”}
},
“required”: [“repo”, “issue_number”]
}
),
Tool(
name=”create_jira_ticket”,
description=”Create a new Jira ticket”,
inputSchema={
“type”: “object”,
“properties”: {
“summary”: {“type”: “string”},
“description”: {“type”: “string”},
“priority”: {“type”: “string”, “enum”: [“low”, “medium”, “high”]}
},
“required”: [“summary”]
}
)
]
# Step 2: Execute the tools when called
@app.call_tool()
async def call_tool(name: str, arguments: dict):
if name == “get_github_issue”:
# Your GitHub API logic here
return TextContent(
type=”text”,
text=f”Fetched issue #{arguments[‘issue_number’]} from {arguments[‘repo’]}”
)
elif name == “create_jira_ticket”:
# Your Jira API logic here
return TextContent(
type=”text”,
text=f”Created Jira ticket: {arguments[‘summary’]}”
)
# Step 3: Run the server
if __name__ == “__main__”:
stdio_server.run(app)
What’s happening here?
@app.list_tools(): This tells the world “here’s what I can do”@app.call_tool(): This actually does the work when someone asksstdio_server.run(app): This starts the server, waiting for connections
Step 2: Connect LangGraph as the MCP Client {#step2}
Now you create the LangGraph app. This acts as the MCP client – it connects to the server and uses its tools.
Create agent.py and start with just the client setup:
# agent.py – Part 1: Client Setup
from langchain_mcp_adapters.client import MultiServerMCPClient
# Initialize the MCP client
# This tells LangGraph where to find your MCP servers
client = MultiServerMCPClient({
“github”: {
“transport”: “stdio”, # Local connection
“command”: “python”, # Run Python
“args”: [“server.py”] # Your server file
},
“jira”: {
“transport”: “stdio”,
“command”: “python”,
“args”: [“jira_server.py”]
}
})
# Load tools from the MCP servers
async def load_tools():
await client.connect()
tools = []
for server_name in client.servers:
server_tools = await client.list_tools(server_name)
tools.extend(server_tools)
return tools
What’s happening here?
MultiServerMCPClient(): This can connect to MULTIPLE servers at once"transport": "stdio": Local connection (we’ll cover remote later)load_tools(): Fetches all available tools from all servers
Step 3: Build the LangGraph Nodes {#step3}
Now let’s build the nodes – these are the individual steps in your workflow.
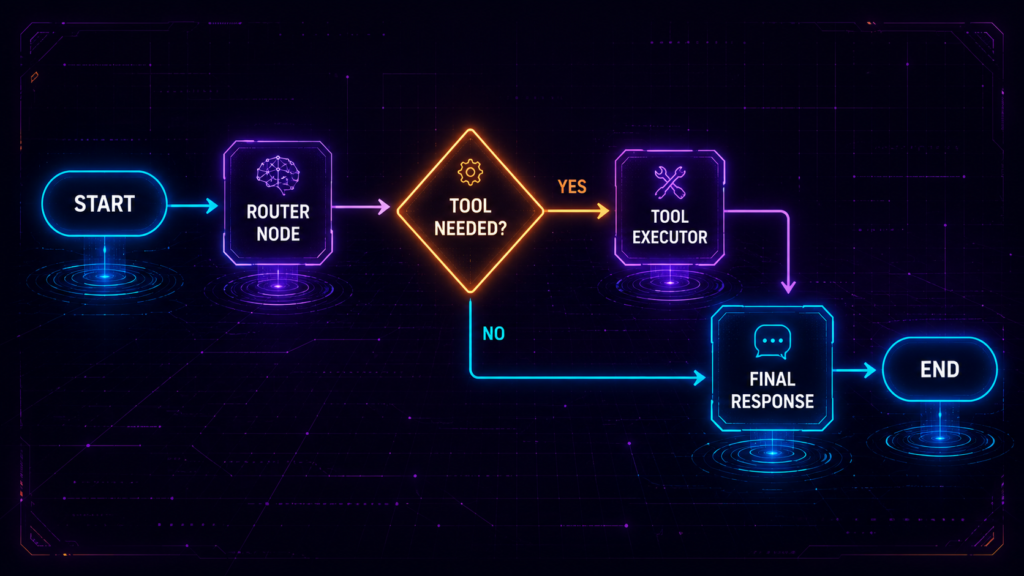
Node 1: The Router Node
This node looks at the user’s query and decides what to do.
# agent.py – Part 2: The Router Node
from langgraph.graph import StateGraph, END
from langchain_openai import ChatOpenAI
from typing import TypedDict, List, Annotated
import operator
# Define your state (what the agent remembers)
class AgentState(TypedDict):
messages: Annotated[List[str], operator.add] # All messages exchanged
current_step: str # What step are we on?
tool_results: dict # Results from tools
async def router_node(state: AgentState):
“””Decide which tool to call based on the user query”””
# Initialize the LLM
llm = ChatOpenAI(model=”gpt-4″)
# Load all tools from MCP servers
tools = await load_tools()
# Give the LLM access to these tools
llm_with_tools = llm.bind_tools(tools)
# Ask the LLM what to do
response = await llm_with_tools.ainvoke(state[“messages”])
# Save the response
state[“messages”].append(response.content)
# Check if the LLM wants to call a tool
if response.tool_calls:
state[“current_step”] = “executing_tool”
else:
state[“current_step”] = “end”
return state
What’s happening here?
The LLM looks at the user’s query
It checks what tools are available (from MCP)
It decides: “Should I call a tool, or just answer directly?”
If it wants a tool, it sets
current_step = "executing_tool"If not, it sets
current_step = "end"
Node 2: The Tool Executor Node
This node actually runs the tool through MCP.
# agent.py – Part 3: The Tool Executor Node
async def tool_executor_node(state: AgentState):
“””Execute the MCP tools”””
# Get the last message (which contains the tool call)
messages = state[“messages”]
last_message = messages[-1]
# Check if the last message is asking to call a tool
if hasattr(last_message, “tool_calls”):
for tool_call in last_message.tool_calls:
# Execute through MCP
result = await client.call_tool(
server_name=tool_call[“name”].split(“_”)[0], # Extract server name
tool_name=tool_call[“name”],
arguments=tool_call[“args”]
)
# Save the result
state[“tool_results”][tool_call[“name”]] = result
state[“messages”].append(f”Tool result: {result}”)
state[“current_step”] = “end”
return state
What’s happening here?
Extract the tool call from the last message
Use the MCP client to actually execute the tool
Save the result so the agent can use it later
Node 3: The Final Response Node
This node generates the final answer using the tool results.
# agent.py – Part 4: The Final Response Node
async def final_response_node(state: AgentState):
“””Generate final response based on tool results”””
llm = ChatOpenAI(model=”gpt-4″)
# Combine all context
context = “\n”.join(state[“messages”])
# Generate the final answer
response = await llm.ainvoke(
f”Based on this context, provide a final answer:\n{context}”
)
state[“messages”].append(response.content)
return state
Step 4: Create the Graph Routing {#step4}
Now we connect everything together into a graph.
# agent.py – Part 5: Build the Graph
# Create the graph builder
builder = StateGraph(AgentState)
# Add all nodes
builder.add_node(“router”, router_node)
builder.add_node(“tool_executor”, tool_executor_node)
builder.add_node(“final_response”, final_response_node)
# Set the entry point
builder.set_entry_point(“router”)
# Add conditional routing
builder.add_conditional_edges(
“router”,
lambda state: state[“current_step”],
{
“executing_tool”: “tool_executor”, # If tool needed, go to executor
“end”: “final_response” # If not, go to final answer
}
)
# Add remaining edges
builder.add_edge(“tool_executor”, “final_response”) # After tool, answer
builder.add_edge(“final_response”, END) # End the workflow
# Compile the graph
app = builder.compile()
What’s happening here?
Router → Conditional: If tool needed, go to executor; else go to final response
Tool Executor → Final Response: After running the tool, generate the answer
Final Response → END: Workflow is complete
Step 5: Run Everything {#step5}
Finally, run your agent:
# agent.py – Part 6: Run the Agent
import asyncio
async def main():
result = await app.ainvoke({
“messages”: [“Get GitHub issue #42 from repo ‘my-org/my-repo'”],
“current_step”: “”,
“tool_results”: {}
})
# Print the final answer
print(result[“messages”][-1])
if __name__ == “__main__”:
asyncio.run(main())
What’s happening here?
Send a user query to the agent
The agent routes, executes tools, and generates a response
Print the final answer
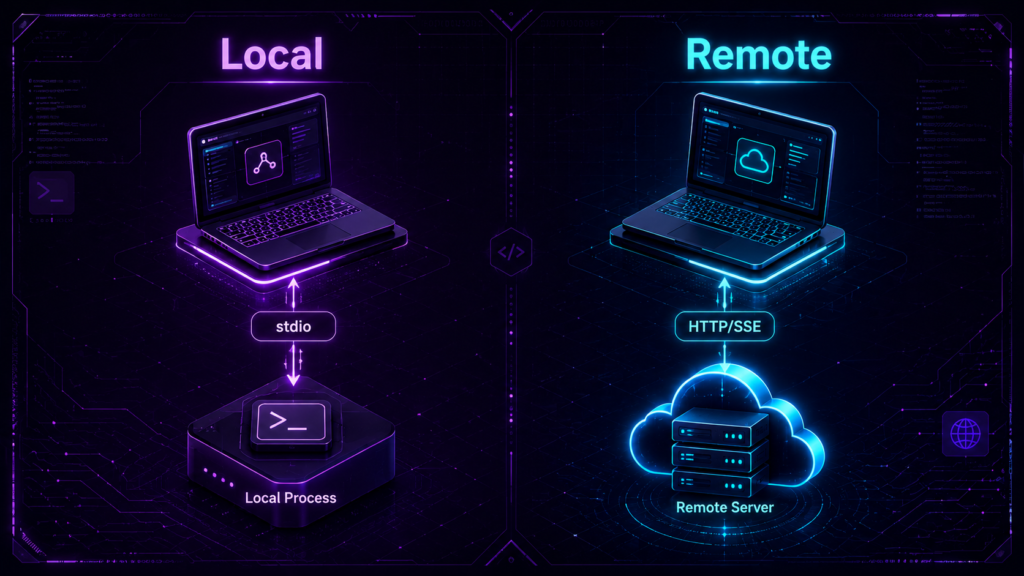
7. Local vs Remote: Where Your Server Lives
Local MCP Servers (stdio transport)
For local development, the MCP server runs on your machine.
Perfect for:
Local files and SQLite databases
Development and testing
Desktop applications
Quick prototyping
client = MultiServerMCPClient({
“local_db”: {
“transport”: “stdio”,
“command”: “python”,
“args”: [“db_server.py”]
}
})
Remote MCP Servers (HTTP/SSE)
For production, the MCP server runs in the cloud.
Perfect for:
Cloud-hosted services (AWS, Azure, GCP)
Shared enterprise tools
Multi-user applications
Production deployments
client = MultiServerMCPClient({
“remote_github”: {
“transport”: “sse”,
“url”: “https://mcp.github.com/your-org/server”
}
})
8. Stateful vs Stateless:
This is one of the most misunderstood concepts. Let me explain with an analogy.
Stateless (Default) – The Forgetful Intern
By default, MCP is like a forgetful intern:
You tell them: “Get me data from GitHub”
They do it
They hang up immediately
If you need more data, you have to call them again
Stateless is simple and safe. No hanging connections, no resource leaks.
# Stateless – Default behavior
# Each tool call opens a fresh connection
await client.call_tool(“github”, “get_issue”, args)
# Connection closes immediately
Stateful – The Focused Worker
But what if you’re halfway through a Jira workflow and need to keep the connection alive?
Stateful is like a focused worker:
You tell them: “Stay on the line, I have multiple tasks for you”
They stay connected
You give them sequential tasks
They hang up only when you say so
# Stateful – Keep connection alive
async with client.session(“jira_server”) as session:
# Step 1: Search for tickets
tickets = await session.call_tool(“search_jira”, {“query”: “status:open”})
# Step 2: Update each ticket
for ticket in tickets:
await session.call_tool(“update_jira”, {
“issue_key”: ticket[“key”],
“status”: “in-progress”
})
# Step 3: Create summary
summary = await session.call_tool(“generate_summary”, {“tickets”: tickets})
# Session automatically closes when block ends
When to Use Which ?
| Scenario | Use |
|---|---|
| Single tool call | Stateless (default) |
| Independent operations | Stateless (default) |
| Simple queries | Stateless (default) |
| Chain of multiple tool calls to same system | Stateful |
| Transactions needing rollback | Stateful |
| Performance-critical workflows | Stateful |
| Multi-step operations | Stateful |
9. Real-World Example: GitHub + Jira Agent
Let’s build a real-world agent that monitors GitHub issues and creates Jira tickets.
Scenario
User asks: “Check GitHub for high-priority bugs”
Agent fetches issues from GitHub
For each bug, it creates a Jira ticket
It posts a summary to Slack
Complete Implementation
# github_jira_agent.py
from langgraph.graph import StateGraph, END
from langchain_openai import ChatOpenAI
from langchain_mcp_adapters.client import MultiServerMCPClient
from typing import TypedDict, List
import asyncio
# Define state
class AgentState(TypedDict):
messages: List[str]
current_step: str
github_issues: list
jira_tickets: list
# Initialize MCP client
client = MultiServerMCPClient({
“github”: {
“transport”: “stdio”,
“command”: “python”,
“args”: [“github_server.py”]
},
“jira”: {
“transport”: “stdio”,
“command”: “python”,
“args”: [“jira_server.py”]
},
“slack”: {
“transport”: “stdio”,
“command”: “python”,
“args”: [“slack_server.py”]
}
})
async def load_tools():
await client.connect()
tools = []
for server_name in client.servers:
server_tools = await client.list_tools(server_name)
tools.extend(server_tools)
return tools
# Node 1: Fetch GitHub issues
async def fetch_github_node(state: AgentState):
llm = ChatOpenAI(model=”gpt-4″)
tools = await load_tools()
llm_with_tools = llm.bind_tools(tools)
response = await llm_with_tools.ainvoke(state[“messages”])
state[“messages”].append(response.content)
if response.tool_calls:
for tool_call in response.tool_calls:
if “github” in tool_call[“name”]:
result = await client.call_tool(
“github”,
tool_call[“name”],
tool_call[“args”]
)
state[“github_issues”] = result
state[“current_step”] = “process_issues”
break
return state
# Node 2: Process issues and create Jira tickets
async def process_issues_node(state: AgentState):
for issue in state[“github_issues”]:
# Create Jira ticket for each issue
result = await client.call_tool(
“jira”,
“create_ticket”,
{
“summary”: f”Bug: {issue[‘title’]}”,
“description”: issue[‘body’],
“priority”: “high” if issue[‘labels’].count(‘bug’) > 2 else “medium”
}
)
state[“jira_tickets”].append(result)
state[“current_step”] = “notify_slack”
return state
# Node 3: Notify Slack
async def notify_slack_node(state: AgentState):
message = f”Created {len(state[‘jira_tickets’])} Jira tickets from GitHub issues”
await client.call_tool(
“slack”,
“send_message”,
{“channel”: “#engineering”, “message”: message}
)
state[“current_step”] = “end”
return state
# Build graph
builder = StateGraph(AgentState)
builder.add_node(“fetch_github”, fetch_github_node)
builder.add_node(“process_issues”, process_issues_node)
builder.add_node(“notify_slack”, notify_slack_node)
builder.set_entry_point(“fetch_github”)
builder.add_edge(“fetch_github”, “process_issues”)
builder.add_edge(“process_issues”, “notify_slack”)
builder.add_edge(“notify_slack”, END)
app = builder.compile()
# Run
async def main():
result = await app.ainvoke({
“messages”: [“Check GitHub for high-priority bugs in our main repo”],
“current_step”: “”,
“github_issues”: [],
“jira_tickets”: []
})
print(result[“messages”][-1])
if __name__ == “__main__”:
asyncio.run(main())
10. Common Beginner Mistakes (And How to Avoid Them)
Mistake 1: Forgetting to Load Tools Before Binding
Problem: You try to use tools before the MCP client is connected.
# ❌ WRONG – This will fail
tools = await load_tools() # Client not connected yet
Fix: Always connect first.
# ✅ RIGHT
async def setup():
await client.connect() # First, connect
tools = await load_tools() # Then, load tools
return tools
Mistake 2: Assuming All Tools Are Always Available
Problem: Your code crashes when an MCP server is offline.
# ❌ WRONG – No error handling
result = await client.call_tool(“github”, “get_issue”, args)
Fix: Add fallback logic.
# ✅ RIGHT
try:
result = await client.call_tool(“github”, “get_issue”, args)
except ConnectionError:
# Fall back to cached data
result = await client.call_tool(“cache”, “get_issue”, args)
Mistake 3: Not Handling Rate Limits
Problem: MCP servers have rate limits. You hit them and fail.
Fix: Add retry logic.
from tenacity import retry, stop_after_attempt, wait_exponential
@retry(stop=stop_after_attempt(3), wait=wait_exponential(multiplier=1, min=2, max=10))
async def call_with_retry(client, server, tool, args):
return await client.call_tool(server, tool, args)
Mistake 4: Mixing Up Server Names
Problem: You call a tool on the wrong server.
# ❌ WRONG – Wrong server name
await client.call_tool(“slack”, “get_github_issue”, args) # GitHub tool on Slack server!
Fix: Define a clear mapping.
# ✅ RIGHT
SERVER_MAP = {
“github”: “github_server”,
“jira”: “jira_server”,
“slack”: “slack_server”
}
await client.call_tool(SERVER_MAP[“github”], “get_issue”, args)
Mistake 5: Not Closing Sessions (Resource Leak)
Problem: You open a session and never close it.
# ❌ WRONG – Resource leak
session = await client.create_session(“github”)
await session.call_tool(…)
# Session never closes!
Fix: Always use async with.
# ✅ RIGHT
async with client.session(“github”) as session:
await session.call_tool(…)
# Session automatically closes
11. The Bottom Line :
| Component | What It Does | When to Use |
|---|---|---|
| LangGraph | Orchestration, state, routing | Multi-step workflows with branching |
| MCP | Standardized tool access | Connecting to external systems |
| LangGraph + MCP | Smart + Connected agents | Complex agents with external tools |
The Three-Step Mental Model
LangGraph is the brain – It decides what to do
MCP is the universal plug – It connects to external systems
Together they build agents – That can reason AND act
The verdict? LangGraph gives you the control you need for complex workflows. MCP gives you the access you need for real-world systems. Together, they turn an agent from “a model with prompts” into a real workflow engine with real-world access.