
Learn what a checkpointer is in LangGraph, how it preserves state across sessions, how thread_id, time travel and checkpoint_ns work, and why it matters for human-in-the-loop workflows. Includes Python code and real-world examples.
What Is a Checkpointer in LangGraph? (The TL;DR)
Let’s cut the jargon.
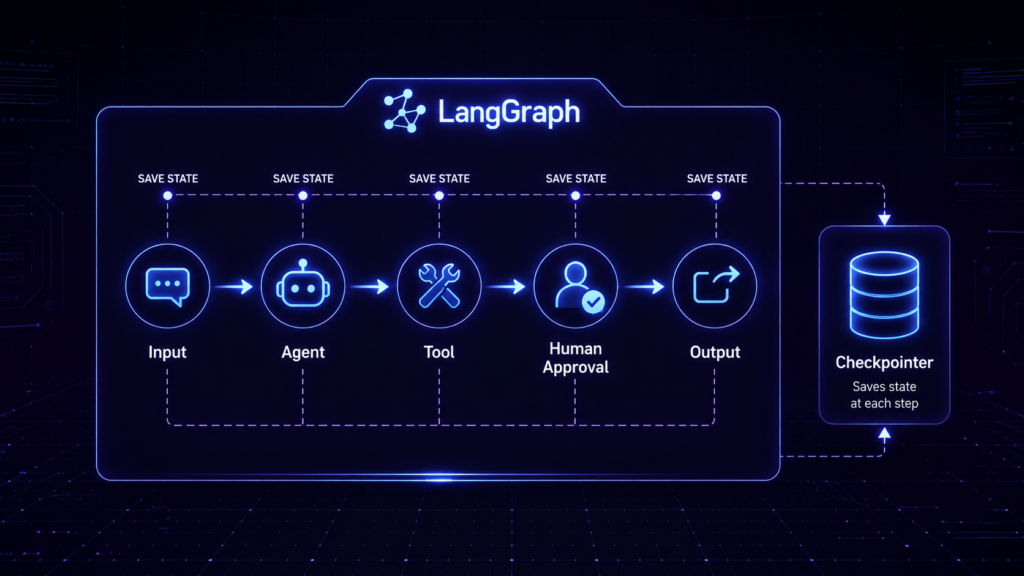
A checkpointer in LangGraph is basically a save point for your AI agent’s brain.
Just like how you save your game progress before a tough boss fight, a checkpointer saves a snapshot of your graph’s state after every single node execution. It’s what makes your agent remember where it was, even if:
The server crashes
The user goes for chai and comes back 2 hours later
A human needs to approve something before the agent proceeds
The simplest way to understand it:
Without a checkpointer, your agent has dementia. With a checkpointer, your agent has perfect memory.
Here’s the core idea:
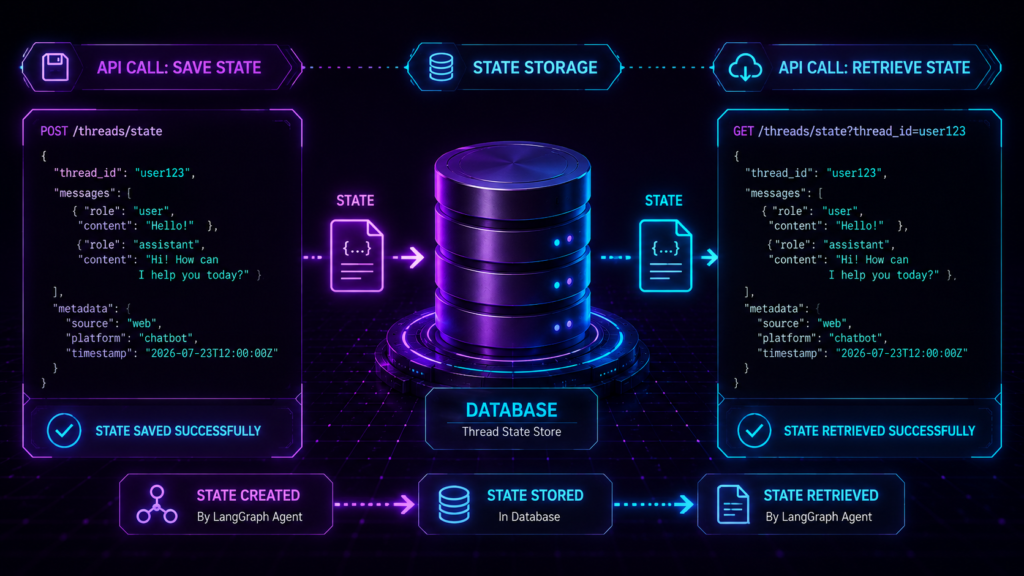
If you want conversation memory across sessions, attach a checkpointer to your compiled graph and reuse the same
thread_idacross API calls.If you want to isolate nested workflows, use
checkpoint_nsto keep their state separate.If your graph pauses for human input, the state stays frozen safely in the checkpointer under that same
thread_id.
Why Checkpointers Actually Matter ?
Look, without checkpointing, your LangGraph workflow is basically a one-and-done deal. Once the run ends, the state vanishes into thin air unless you manually store it somewhere.
I’ve seen too many developers build impressive AI workflows that work beautifully in demo, only to fall apart in production because they forgot this one thing.
With a checkpointer, your graph becomes:
| Capability | What It Means in Real Life |
|---|---|
| Persistent | The agent can continue a conversation tomorrow, next week, or next month |
| Resumable | Multi-step workflows can survive server restarts and network failures |
| Pausable | Human approval gates can pause safely without losing progress |
| Isolated | Nested graphs don’t step on each other’s toes |
The bottom line? Checkpointers turn LangGraph from a cool demo into a production-grade system. If you’re building anything serious, you need this.
What Actually Gets Saved? (The Data)
This is where people get confused. A checkpointer doesn’t just save the final answer. That would be useless.
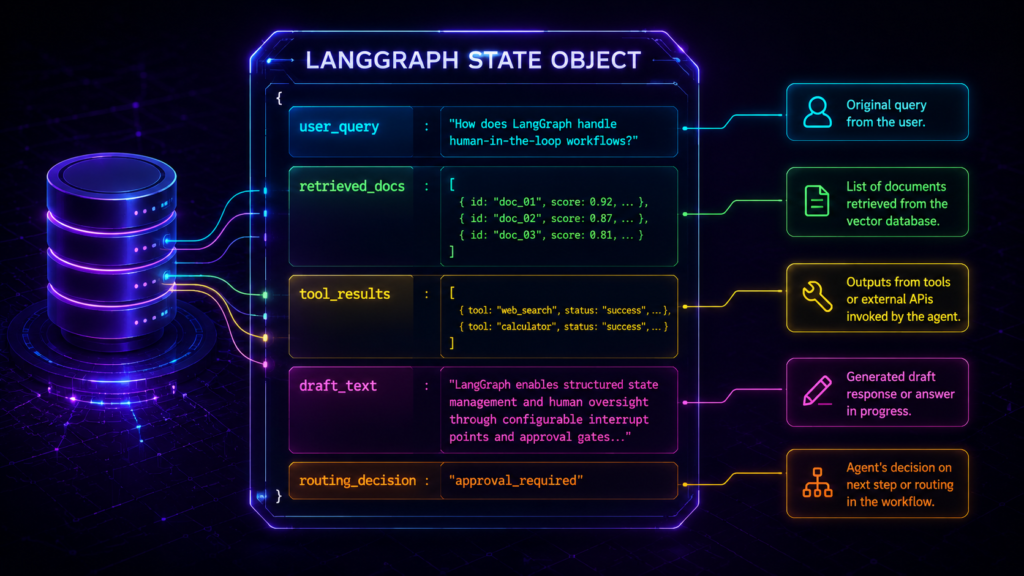
Instead, it stores the entire graph state after each step. Think of it as a complete photograph of everything your agent knows at that moment.
Here’s what gets preserved:
The user’s original query
All retrieved documents
Intermediate tool results (API calls, database queries)
Generated drafts and intermediate outputs
Routing decisions (which path the agent took)
Any custom state fields you define in your State class
This becomes critical when your workflow is:
Long-running (takes 10+ steps)
Branching (multiple possible paths)
Interrupted (human needs to step in)
How to Set Up Conversation Memory Across Sessions ?
This is the most common use case. You want your AI agent to remember who you are, what you talked about, and what you asked for—even if you come back tomorrow.
The Two-Step Pattern
You need to do exactly two things:
Attach a checkpointer to your compiled graph
Reuse the same
thread_idin later API calls
That thread_id is the magic key. It tells LangGraph, “Hey, this is the same conversation as before.”
The Code:
Here’s how you actually implement this:
from langgraph.graph import StateGraph, MessagesState
from langgraph_checkpoint_sqlite import SqliteSaver
from langgraph_checkpoint_postgres import PostgresSaver
# Option 1: For local development (SQLite)
with SqliteSaver.from_conn_string(“checkpoints.db”) as checkpointer:
graph = StateGraph(MessagesState)
# … define your nodes and edges …
compiled_graph = graph.compile(checkpointer=checkpointer)
# Option 2: For production (PostgreSQL)
# from psycopg_pool import ConnectionPool
# connection_string = “postgresql://user:pass@localhost:5432/checkpoints”
# pool = ConnectionPool(connection_string, max_size=20)
# with pool.connection() as conn:
# checkpointer = PostgresSaver(conn)
# compiled_graph = graph.compile(checkpointer=checkpointer)
# The key: Reuse this config for every API call in the same conversation
config = {
“configurable”: {
“thread_id”: “user_123_conversation_456”
}
}
# First call (using standard invoke)
result = compiled_graph.invoke(
{“messages”: [{“role”: “user”, “content”: “Hello, I’m Ravi”}]},
config=config
)
# Second call (next day, same thread_id)
result = compiled_graph.invoke(
{“messages”: [{“role”: “user”, “content”: “What was my name?”}]},
config=config
)
# The agent remembers: “Your name is Ravi”
What Is checkpoint_ns? (The Namespace Mystery)
This one trips up a lot of developers. Let me explain it simply.
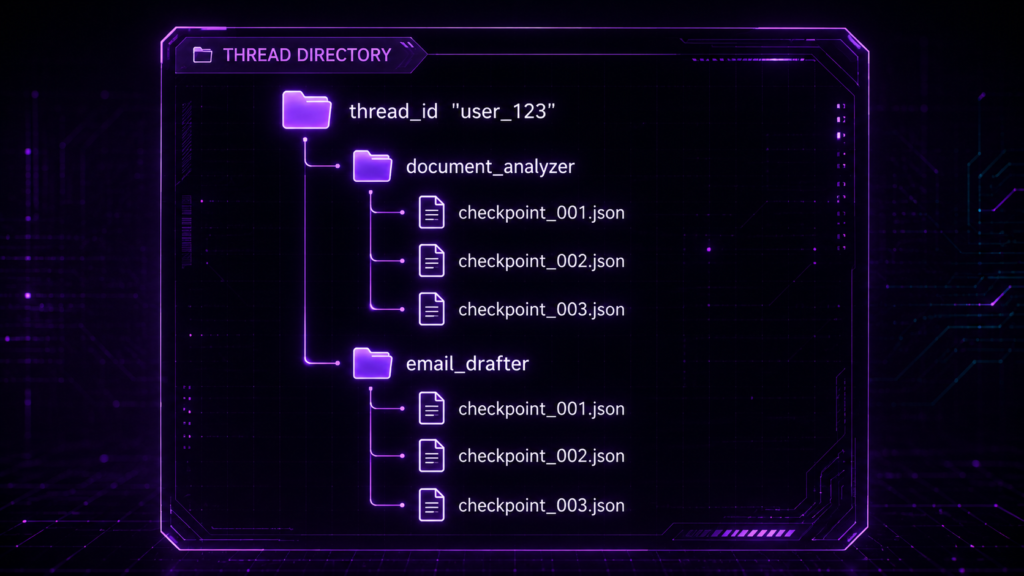
checkpoint_ns is a namespace string used to isolate subgraphs and prevent checkpoint collisions in complex nested graphs.
Think of It Like Folders
Imagine you’re organizing files on your computer:
thread_idis like the main folder (say, “Project_2026”)checkpoint_nsis like a subfolder inside it (“/design_files”, “/code_files”, “/docs”)
Why does this matter?
The Problem It Solves
In production, you often have:
Multiple nested workflows running under the same user session
Different subgraphs that might have overlapping state keys
Parallel executions that need isolation
Without namespaces, these would overwrite each other’s checkpoints. With namespaces, they stay happily separated.
Example:
# Main workflow
main_config = {
“configurable”: {
“thread_id”: “user_123”
}
}
# Child subgraph for document analysis
doc_analysis_config = {
“configurable”: {
“thread_id”: “user_123”,
“checkpoint_ns”: “document_analyzer”
}
}
# Child subgraph for email drafting
email_draft_config = {
“configurable”: {
“thread_id”: “user_123”,
“checkpoint_ns”: “email_drafter”
}
}
# Both subgraphs run under the same user session
# But their checkpoints are isolated in different namespaces
What Happens During Human-in-the-Loop?
This is where checkpointers truly shine.
When your graph pauses for human input, the state does not disappear.
Let me repeat that because it’s so important:
The state remains safely frozen in the checkpointer database under the current thread_id.
The Workflow in Action
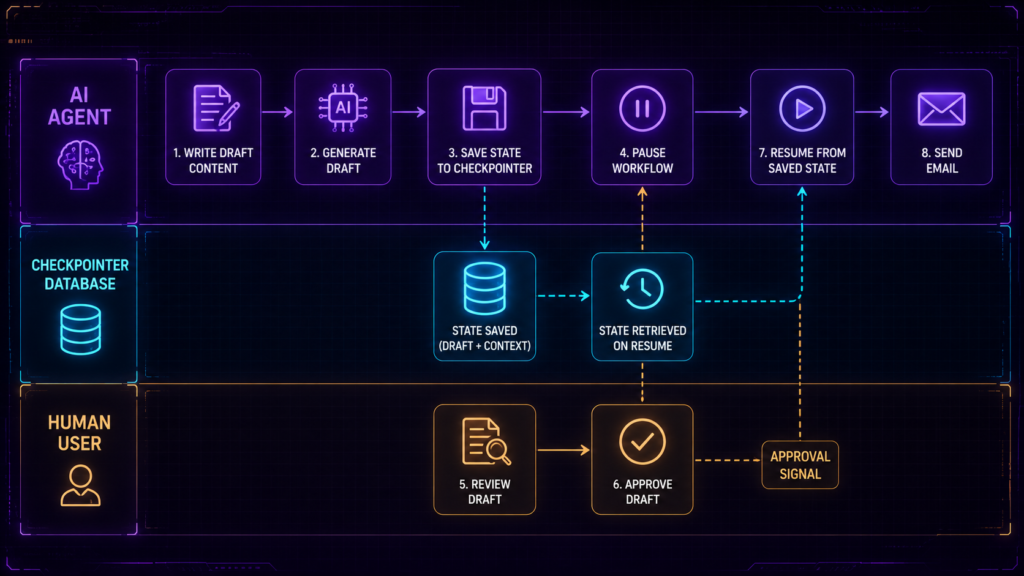
Imagine a workflow that drafts an email and waits for your approval before sending it:
Step 1: The graph generates a draft email
Step 2: It reaches an “approval” node
Step 3: The run pauses (right here)
Step 4: The current state is automatically checkpointed
Step 5: A human (you) reviews the draft
Step 6: You approve, edit, or reject
Step 7: The graph resumes from the saved state
No state is lost. No workflow restarts from scratch.
The Code Pattern:
from langgraph_checkpoint_sqlite import SqliteSaver
from langgraph.graph import StateGraph, END
# Define a workflow with a human approval node
builder = StateGraph(EmailDraftState)
builder.add_node(“draft_writer”, write_draft)
builder.add_node(“human_approval”, approval_node)
builder.add_node(“email_sender”, send_email)
builder.add_edge(“draft_writer”, “human_approval”)
builder.add_edge(“human_approval”, “email_sender”)
builder.add_edge(“email_sender”, END)
# The checkpointer makes this all possible
with SqliteSaver.from_conn_string(“email_workflow.db”) as checkpointer:
graph = builder.compile(checkpointer=checkpointer)
# Start the workflow
config = {“configurable”: {“thread_id”: “email_task_123”}}
result = graph.invoke(
{“recipient”: “client@company.com”, “content”: “Proposal attached”},
config=config
)
# Workflow pauses at human_approval node
# State is saved in database under thread_id “email_task_123”
# Later (after human approves)
resumed_result = graph.invoke(None, config=config) # Continue from where we left off
# Email gets sent!
 .
.
“But what if the human makes a mistake? Can we go back?”
Time Travel in LangGraph: Undo Your Agent’s Mistakes (Like Ctrl+Z)
You know how you can hit Ctrl+Z in Word to undo a mistake? Or go back to a previous save point in a video game? LangGraph gives you the exact same superpower with your AI agent. It’s called time travel, and it’s one of the coolest features that comes free with checkpointers.
What Is Time Travel?
Time travel in LangGraph means:
You can roll back your agent’s state to any previous step, fix something, and replay from there.
Imagine this scenario:
Your agent writes an email draft
It sends the draft for human approval
The human says, “Nahi, ye sahi nahi hai. Wapas jao aur phir se likho.” (No, this isn’t right. Go back and rewrite it.)
But here’s the problem: your agent has already processed 15 steps. The state is deep inside the workflow. If you restart from scratch, you’ll lose everything—the context, the retrieved documents, the partial work.
With time travel? You simply tell the graph: “Bhai, wapas jao step number 8 pe. Wahan se phir se start karo.” (Bro, go back to step number 8. Start again from there.)
And it works. Flawlessly.
How It Works Under the Hood
Remember how a checkpointer saves the state after every single node?
That means your graph’s entire history—every single step, every decision, every intermediate result—is sitting there in your database.
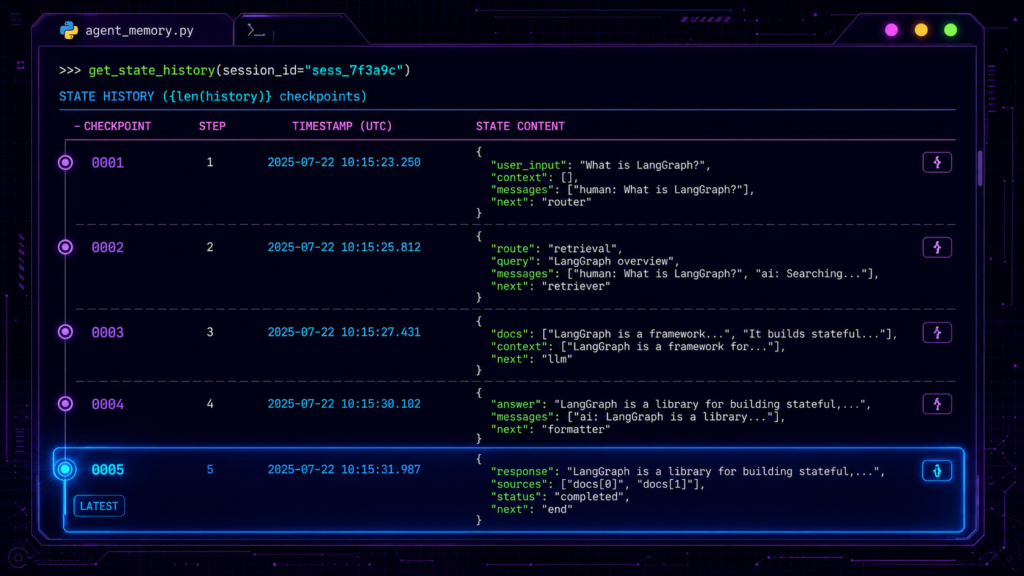
graph.get_state_history() is the method that lets you peek into this history.
Here’s what it returns:
history = graph.get_state_history(config)
for state in history:
print(f”Step: {state.step}”)
print(f”State: {state.values}”)
print(f”—“)
You’ll see something like:
Step: 0
State: {“query”: “Write an email to client”}
—
Step: 1
State: {“query”: “Write an email to client”, “draft”: “Dear Sir…”}
—
Step: 2
State: {“query”: “Write an email to client”, “draft”: “Dear Sir…”, “approved”: False}
—
Step: 3
State: {“query”: “Write an email to client”, “draft”: “Dear Sir…”, “approved”: True, “sent”: True}
When Would You Actually Use This?
Let me give you three real-world scenarios:
| Scenario | Why You Need Time Travel |
|---|---|
| Human Made a Bad Decision | A human approved a wrong action. Now you need to go back before the approval and try a different path. |
| Agent Went Down the Wrong Path | The agent chose the wrong tool or made a bad routing decision. You want to re-route from that point. |
| Debugging Production Issues | Something went wrong and you need to see exactly what happened at each step. Time travel lets you replay the entire workflow. |
The Code: How to Actually Do It
Let me show you step-by-step. I’ll keep it super simple.
Step 1: Run Your Graph (With a Checkpointer Attached)
First, make sure you have a checkpointer attached:
from langgraph.graph import StateGraph, MessagesState
from langgraph_checkpoint_sqlite import SqliteSaver
# Define your graph
builder = StateGraph(MessagesState)
# … add nodes, edges, etc.
# Attach checkpointer (this enables time travel)
with SqliteSaver.from_conn_string(“my_workflow.db”) as checkpointer:
graph = builder.compile(checkpointer=checkpointer)
# Run the workflow
config = {“configurable”: {“thread_id”: “user_123_workflow_456”}}
result = graph.invoke(
{“messages”: [{“role”: “user”, “content”: “Write a proposal”}]},
config=config
)
Step 2: View the Entire History
Now, let’s see all the checkpoints that were saved:
# Get the full history of this thread
history = graph.get_state_history(config)
# Print it in a readable way
for idx, state_snapshot in enumerate(history):
print(f”📌 Checkpoint #{idx + 1}”)
print(f” Step Number: {state_snapshot.step}”)
print(f” State Content: {state_snapshot.values}”)
print(f” When: {state_snapshot.timestamp}”)
print(“-” * 50)
Real Output Example:
📌 Checkpoint #1
Step Number: 0
State Content: {‘messages’: [{‘role’: ‘user’, ‘content’: ‘Write a proposal’}]}
When: 2026-07-23 10:15:23
————————————————–
📌 Checkpoint #2
Step Number: 1
State Content: {‘messages’: […], ‘draft’: ‘First draft…’}
When: 2026-07-23 10:15:24
————————————————–
📌 Checkpoint #3
Step Number: 2
State Content: {‘messages’: […], ‘draft’: ‘First draft…’, ‘approved’: False}
When: 2026-07-23 10:15:25
————————————————–
📌 Checkpoint #4
Step Number: 3
State Content: {‘messages’: […], ‘draft’: ‘First draft…’, ‘approved’: True, ‘sent’: True}
When: 2026-07-23 10:15:26
————————————————–
Step 3: Choose Your “Time Travel” Destination
Let’s say you realize the human made a wrong approval at Step 2. You want to go back to Checkpoint #2 (Step 1) where the draft was generated but not yet approved.
# Get the history
history = list(graph.get_state_history(config))
# Checkpoint #2 is at index 1 (remember, Python starts at 0)
target_checkpoint = history[1] # This is Step 1
# Get the config for that specific checkpoint
target_config = target_checkpoint.config
print(f”Traveling back to Step: {target_checkpoint.step}”)
print(f”State at that time: {target_checkpoint.values}”)
Step 4: Resume from That Checkpoint
Now comes the magic. You simply invoke() the graph with that old config:
# This is the time travel moment! 🚀
resumed_result = graph.invoke(
None, # No new input needed
config=target_config # Use the old checkpoint’s config
)
# The graph resumes from exactly that point
# It’s like nothing ever happened after Step 1
Here’s the easiest way to understand time travel:
| Concept | Plain English |
|---|---|
graph.get_state_history() | Opens the timeline of your workflow |
state.config | The coordinates of that specific moment in time |
graph.invoke(None, config=old_config) | Presses “Load Game” and continues from that save point |
// When you resume from an old state, LangGraph doesn’t delete the “mistake” steps. Instead, it forks the history (like Git branches). This reassures developers that they aren’t permanently deleting data when they time travel.
The Minimal Mental Model (Remember Only This)
If you forget everything else, remember these four concepts:
| Concept | Plain English |
|---|---|
| State | Everything the graph knows right now |
| Checkpointer | Where that state is permanently saved |
| thread_id | Which conversation or workflow the state belongs to |
| checkpoint_ns | Which subgraph or namespace the state belongs to |
That’s it. Build your mental model around these four pillars, and you’ll understand 90% of what you need.
Where Checkpointers Break (And How to Fix Them)
Let’s get real. Things go wrong in production. Here are the common failure modes and how to fix them:
Problem 1: Checkpoint Database Gets Too Big
The Issue: You’re saving state after every node, and with thousands of conversations, your database is growing like crazy.
The Fix: Implement checkpoint cleanup.
from langgraph.checkpoint.sqlite import SqliteSaver
from datetime import datetime, timedelta
def cleanup_old_checkpoints(days_to_keep=30):
cutoff_date = datetime.now() – timedelta(days=days_to_keep)
# Use your checkpointer’s cleanup method
# Or implement your own pruning logic
pass
Problem 2: Checkpoints Getting Corrupted
The Issue: Your state contains complex objects (like Pandas DataFrames or custom classes) that can’t be serialized properly.
The Fix: Ensure all state fields are serializable.
from typing import List, Dict, Any
from typing_extensions import TypedDict
# Good – All JSON-serializable types
class GoodState(TypedDict):
query: str
results: List[Dict[str, Any]]
count: int
# Bad – Contains unserializable objects
class BadState(TypedDict):
dataframe: pd.DataFrame # Pandas can’t be pickled safely
custom_obj: MyClass # Custom classes need special handling
Problem 3: Thread IDs Getting Mixed Up
The Issue: Different users or conversations are accidentally using the same thread_id, causing state confusion.
The Fix: Always generate unique thread_ids.
import uuid
def generate_thread_id(user_id: str) -> str:
return f”user_{user_id}_{uuid.uuid4().hex[:8]}”
# Instead of:
# thread_id = “user_123” # Too generic
# Use:
thread_id = generate_thread_id(“123”) # “user_123_a3f8d2e1”
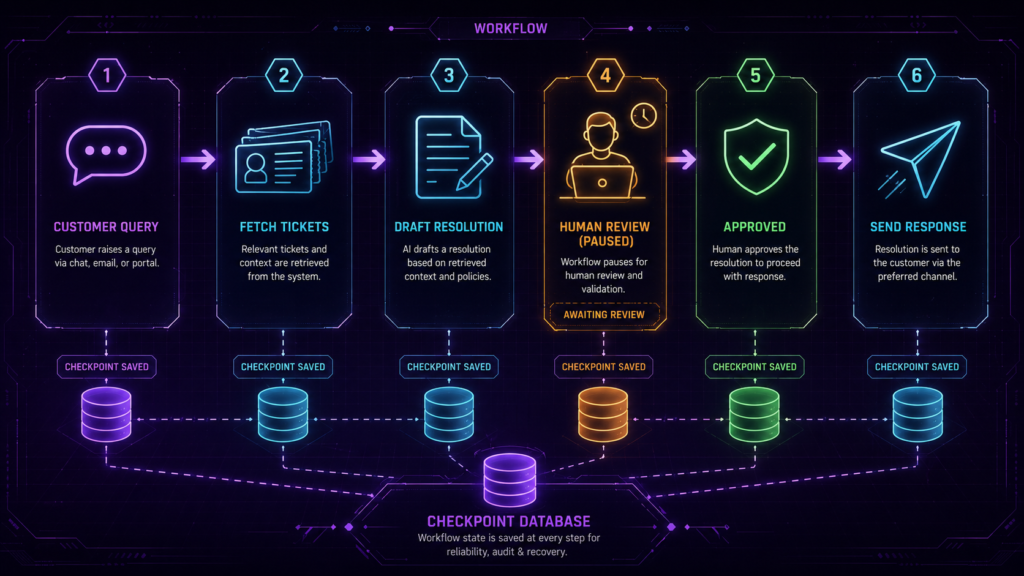
Real-World Production Example: Customer Support Agent
Let me show you how this all comes together in a real workflow.
from langgraph.graph import StateGraph, MessagesState
from langgraph_checkpoint_postgres import PostgresSaver
from langchain_openai import ChatOpenAI
from langchain.tools import tool
from psycopg_pool import ConnectionPool
import psycopg
# Define the state
class SupportState(MessagesState):
customer_id: str
tickets: list
resolution: str
needs_human_approval: bool
# Define tools
@tool
def get_customer_tickets(customer_id: str) -> list:
“””Fetch customer’s previous support tickets”””
# Database query
return [“Ticket #123: Refund request”, “Ticket #456: Billing issue”]
@tool
def draft_resolution(ticket_id: str) -> str:
“””Draft a resolution for the ticket”””
return “We have processed your refund. It will reflect in 3-5 business days.”
# Build the graph
builder = StateGraph(SupportState)
builder.add_node(“fetch_data”, lambda state: {“tickets”: get_customer_tickets(state[“customer_id”])})
builder.add_node(“draft”, lambda state: {“resolution”: draft_resolution(state[“tickets”][0])})
builder.add_node(“human_review”, human_review_node) # Assuming this is defined elsewhere
builder.add_node(“send_response”, send_response_node) # Assuming this is defined elsewhere
builder.add_edge(“fetch_data”, “draft”)
builder.add_edge(“draft”, “human_review”)
# Conditional edge: if human approves, send; if not, re-draft
builder.add_conditional_edges(
“human_review”,
lambda state: “send_response” if state[“needs_human_approval”] else “draft”
)
# Production setup with PostgreSQL
conn_string = “postgresql://user:pass@prod-db:5432/checkpoints”
pool = ConnectionPool(conn_string, max_size=20)
with pool.connection() as conn:
checkpointer = PostgresSaver(conn)
graph = builder.compile(checkpointer=checkpointer)
# User session
config = {“configurable”: {“thread_id”: “user_789_session_001”}}
# Invoke the workflow
response = graph.invoke(
{“customer_id”: “789”, “messages”: [{“role”: “user”, “content”: “My refund hasn’t arrived”}]},
config=config
)
# The graph pauses at human_review if needed
# State is saved. Human reviews. Workflow resumes.
Why This Matters ?
Checkpointers aren’t a nice-to-have feature. They’re the backbone of production-grade LangGraph applications.
Here’s the reality:
| Without Checkpointing | With Checkpointing |
|---|---|
| You get a demo | You get a system |
| Conversations reset every time | Conversations continue forever |
| Human approval is impossible | Human approval is seamless |
| Nested graphs cause chaos | Nested graphs stay organized |
| Production is a nightmare | Production is reliable |
If you’re building anything beyond a prototype, you need checkpointers. It’s not optional.
Common Questions (The “Where” and “When”)
When Should I Use a Checkpointer?
Always in production
When you need conversation memory
When you have human-in-the-loop workflows
When you have multi-step, long-running processes
Where Should I Store Checkpoints?
| Storage | Best For | Why |
|---|---|---|
| SQLite | Local development, testing | Easy setup, no external dependencies |
| PostgreSQL | Production workloads | Scalable, ACID compliant, supports concurrent access |
| Redis | High-speed, temporary caching | Fast, but less durable |
| Custom Storage | Specialized requirements | Implement the BaseCheckpointSaver interface |
Quick Reference Card
# Minimal Production Setup
from langgraph_checkpoint_postgres import PostgresSaver
from psycopg_pool import ConnectionPool
pool = ConnectionPool(“postgresql://user:pass@localhost:5432/checkpoints”)
with pool.connection() as conn:
checkpointer = PostgresSaver(conn)
graph = builder.compile(checkpointer=checkpointer)
# Use the same thread_id for the same conversation
config = {“configurable”: {“thread_id”: “unique_identifier”}}
# Invoke normally
result = graph.invoke(input_data, config=config)
A checkpointer in LangGraph is the persistence backbone of the whole graph. It saves state after each node execution, keeps conversations alive across sessions, isolates nested flows with checkpoint_ns, and preserves paused workflows while waiting for human input.
For production agent systems, it’s not just important—it’s essential.
Here’s your takeaway:
Always use a checkpointer in production
Always use unique thread_ids
Use
checkpoint_nswhen you have nested graphsMonitor your checkpoint database size
Test your human-in-the-loop flows thoroughly
Now go build something that remembers.